

Make every inch count with an easy-to-clean upper-cabinet shelf.
A full day
Beginner
$51–100
Introduction
Create an attractive display shelf for the empty space above your kitchen cabinets. This project requires only basic carpentry skills, and you can build it in a day.
Project overview
If you have empty space above your kitchen cabinets, you already know how difficult it is to keep it clean. And if you’ve ever tried to display anything above them, you also know the surface isn’t flat, so objects sink out of view. Why not solve both problems with an attractive display shelf you can easily build in a day?
This project only requires basic carpentry tools and skills. Even the miter joints can be cut with a simple handsaw miter box. We used an 18-gauge finish nailer to make the job go faster, but you can just as easily predrill and hand-nail. And don’t worry about trying to match your cabinet’s finish or wood type. The shelf will look great if you paint it to match another accent color in the room.
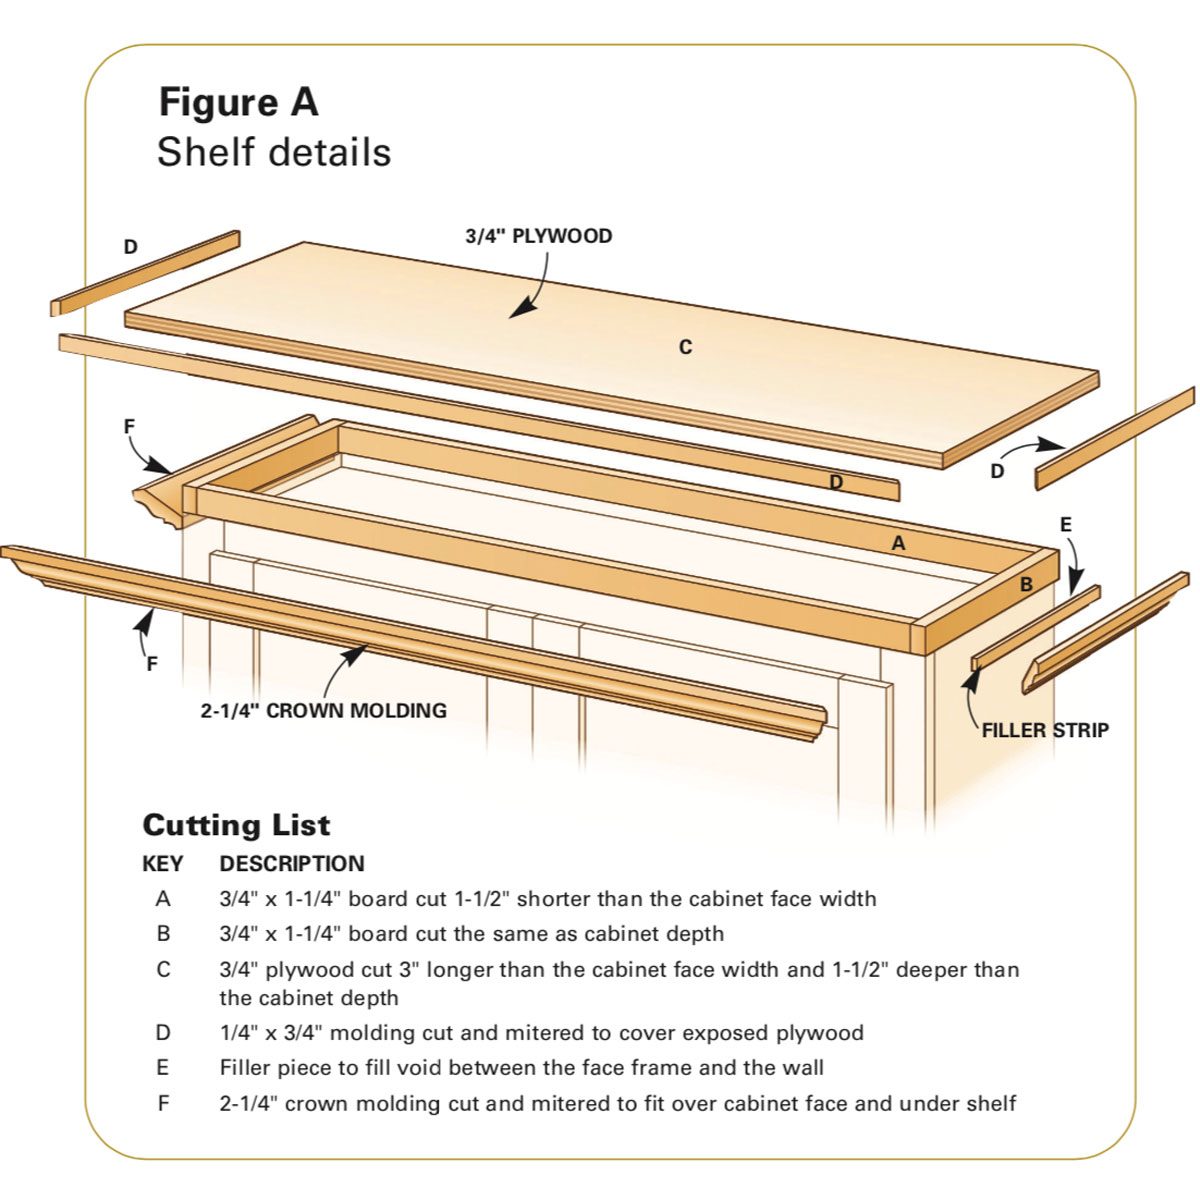
Figure A: Shelf details

Cutting List
A 3/4′ x 1-1/4′ board cut 1-1/2′ shorter than the cabinet face width
B 3/4′ x 1-1/4′ board cut the same as cabinet depth
C 3/4′ plywood cut 3′ longer than the cabinet face width and 1-1/2′ deeper than the cabinet depth
D 1/4′ x 3/4′ molding cut and mitered to cover exposed plywood
E Filler piece to fill void between the face frame and the wall
F 2-1/4′ crown molding cut and mitered to fit over cabinet face and under shelf
Tools Required
- 18-gauge finish nailer
- Cordless drill
- Miter saw
- Nail set
Project step-by-step (9)
Step 1
Measure for materials

Measure the tops of your cabinets to determine your materials list. Also check the distance above the cabinet doors to determine the support cleat height for the shelf.
Step 2
Nail the cleats

Nail cleats to the tops of the cabinets to elevate the shelf. Leave 3/4 in. of space on each side for the side cleats. The side cleats will overhang on the cabinet side. The cleats under the shelf are fillers to elevate the shelf just enough so the crown molding fits under the shelf and yet comfortably clears the doors below. We had about 1 in. of space above the doors, so we needed cleats that were 1-1/4 in. high.
Step 3
Fit the side cleats

Fit the side cleats so there’s a consistent overhang on the edge. We had to notch the cleat to fit behind the window molding.
Step 4
Cut the top

Measure and cut the top from 3/4-in. plywood, overhanging 1-1/2 in. on the front and each side. The best material for the main shelf is 3/4-in. plywood. Get a finished grade that is smooth and easy to sand.
10 Creative Ways to Save on Your Kitchen Renovation
Step 5
Fasten the top

Nail the top to the cleats with 2-in. finish nails. Make sure the overhang is even on each side.
Step 6
Nail the edge

Glue and nail the 3/4-in.-wide edge molding to the exposed plywood edges. Miter the corners for a more finished appearance. If you don’t have access to a table saw, you can carefully cut them with your circular saw and an edge guide. Besides the 2-1/4-in. crown molding, you’ll need trim to cover the edge of the plywood for a finished look. You can use “screen” molding or “parting stop” or just rip a strip from a wider board to 1/4 in. or thicker. Just follow the photos for details about sizing and fitting the pieces.
Step 7
Cut the crown

Position your molding upside down in the miter box to support both the top and the bottom of the molding. Check the direction of the angle twice before you cut.
Step 8
Nail the crown

Nail the crown molding to the face of the cabinet and up into the shelf at an angle. The molding will completely cover the cuts.
Step 9
Add the filler strip

Fit the side pieces of crown molding and slip a 3/16-in.-thick filler strip under the front edge to hide the gap created by the face frame overhang.
Paint your molding to match
Finish up by filling your nail holes and sanding the wood with 150-grit sandpaper. Prime the wood and then select a satin or gloss paint finish that’ll be easy to wipe clean. Because it’s difficult to get an exact cabinet color match for natural wood cabinets, simply pick a color that will accent your kitchen countertops or cabinets.
20 Surprising Tips on How to Paint Kitchen Cabinets