


Can you paint vinyl flooring? Yes! It's a budget-friendly, easy alternative to replacing it, bringing new life to tired vinyl floors.
2 hours plus dry and cure times
Beginner
$70 per 100 sq-ft. of floor
Introduction
Can you paint vinyl flooring? Yes! It's a budget-friendly, easy alternative to replacing it, bringing new life to tired vinyl floors.
Replacing outdated or worn-out flooring is a costly, time-consuming project that’s not always feasible.
As we work to update every space in our 1970s colonial home, we’re trying to be savvy with how we spend our time and money. The vinyl flooring in our small mudroom had certainly seen better days. I searched for a budget-friendly way to update it that would be attractive and durable, and decided painting would be our best choice. I used Rust-Oleum Home Floor Coating, which is specifically made for painting tile, vinyl and linoleum floors. It didn’t require any cumbersome prep work like sanding or priming, so I completed the transformation in less than two hours over two days. For a reasonable cost, I transformed the mudroom floor from dingy and dated to clean and modern. Another option is to use a high-adhesion primer like Benjamin Moore’s Stix with a porch and floor paint topcoat.
Follow these step-by-step instructions to revitalize the vinyl floors in your home with tips from Rachel Otto, paint specialist at Fleury Lumber.
Should You Paint Vinyl Floors?
While it’s certainly possible to paint vinyl floors, the question remains—should you? “You can do it, but it’s generally not recommended,” Otto says. Paint and vinyl don’t like each other very much.” Vinyl’s water—and stain-repellent features also make it difficult for paint to adhere.
That being said, “Painting can be a great option if you can’t afford to replace the floors right now,” Otto says. “Just understand it is a temporary solution.” The floor also must be in sound condition, without any tears, holes or loose sections, to be a good candidate for paint.
Also, learn how to repair and reglue vinyl sheet floors.
Tools Required
- Bucket
- Cleaning brush
- Cleaning Cloth
- Flathead screwdriver or paint can opener
- Paint roller frame and foam or nap rollers
- Paint Tray with Liner
- Paintbrush
- Respirator mask
- Scraper or painter's tool
Materials Required
- Latex gloves
- Painter's tape
- Rags
- Rust-Oleum HOME Floor Coating
Project step-by-step (5)
Step 1
Clean the floor
- This is the most important step. Your floors must be extremely clean, with no dirt or debris, before they can be painted. If not, specks of dirt will be sealed in. Take your time and be patient.
- Start by wiping down the whole floor with a water-soaked rag. If painting a large area, use a mop.
- Use a cleaning brush to scour the surface and free any stuck-on dirt. Grab a scraper tool for stubborn pieces.
- Finish by scrubbing your floors with a cleaning agent. The Rust-Oleum Kit comes with a heavy-duty liquid cleaner that removes any remaining grease and grime.
- Use a reusable face respirator to ensure you don’t breathe in any fumes.

Step 2
Apply painter’s tape
- Adhere painter’s tape to baseboard trim, flooring transitions, air vents or any other edges you want to protect from the paint.
- Once the tape is in place, run your finger across the bottom edge to make sure it’s firmly attached to the surface. This ensures the paint does not seep up behind the tape.

Step 3
Paint base coat
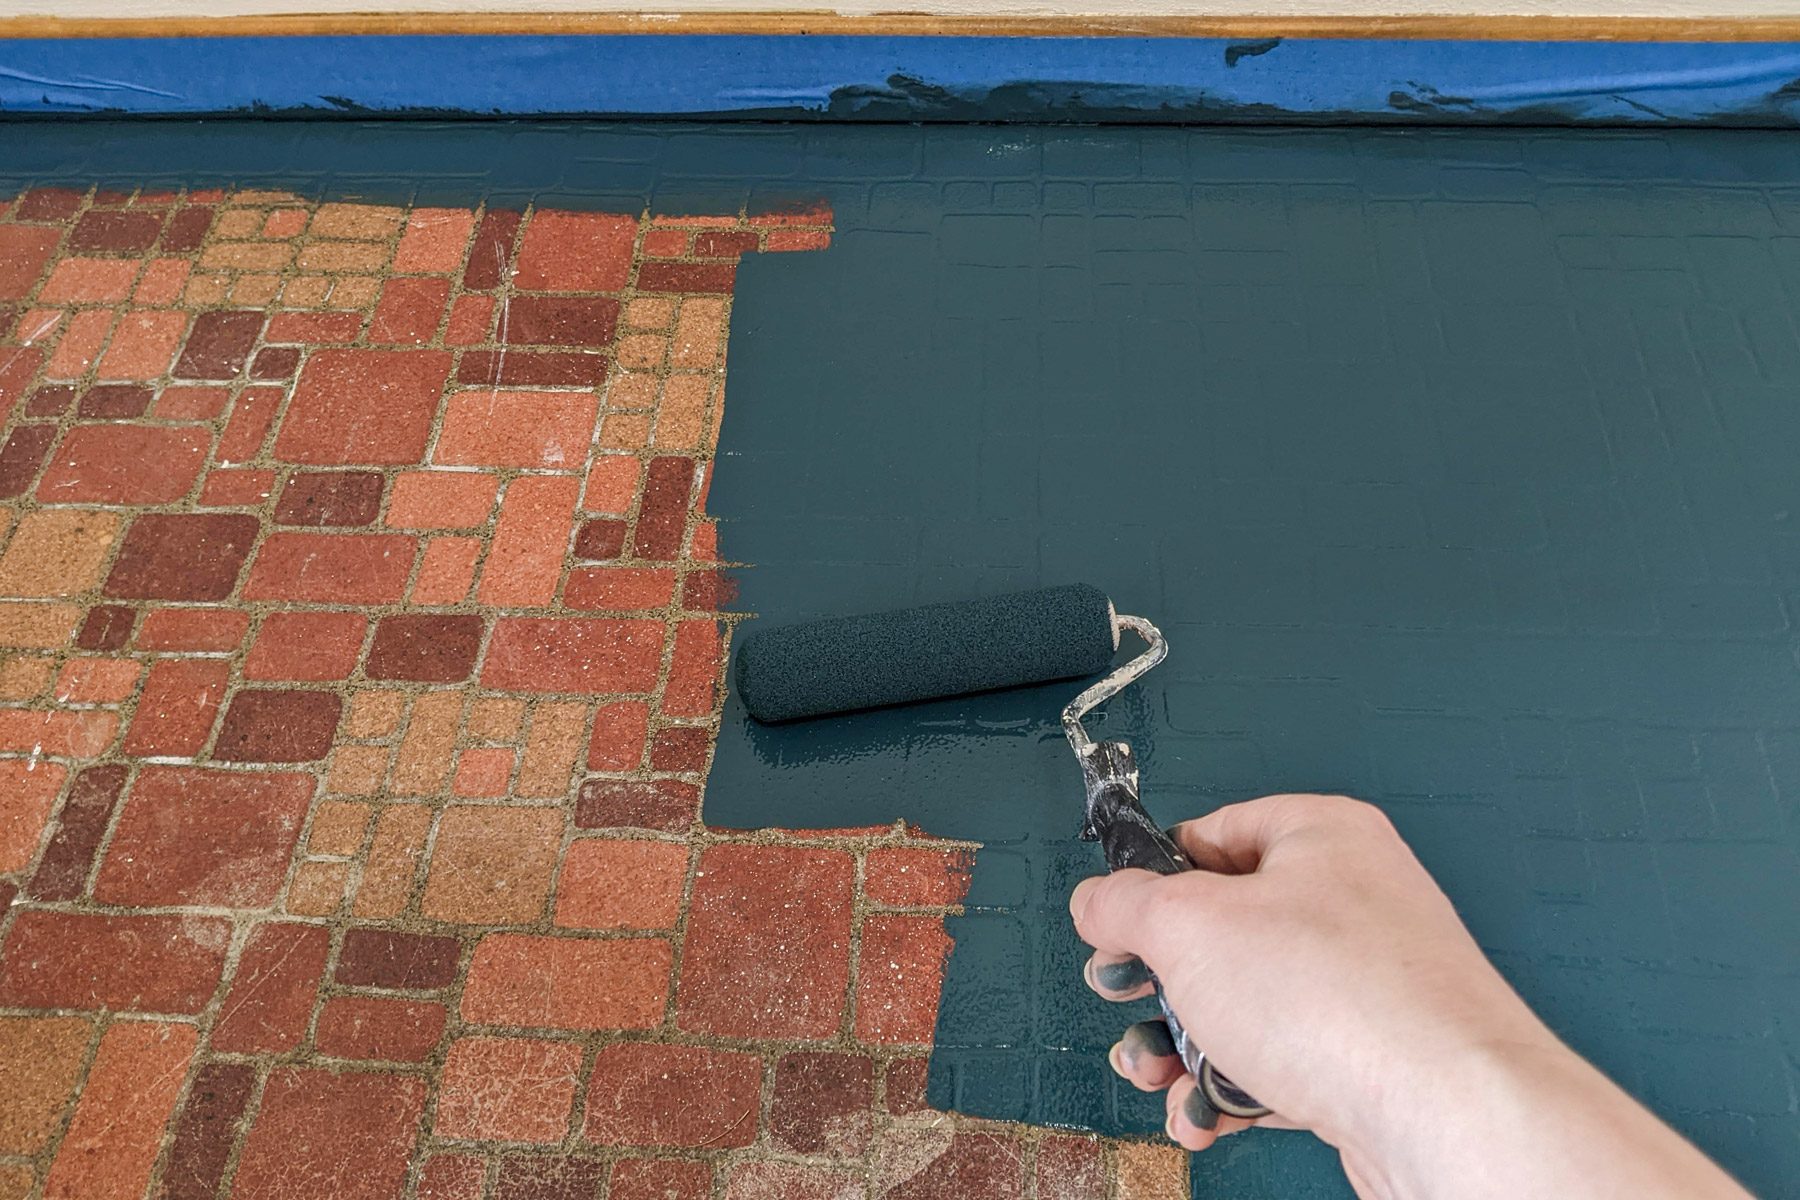
- Apply the base color coat to your floor. Start by cutting in the edges with a paintbrush, then cover the brush marks with a paint roller. Continue to roll paint across the entire surface of your floor.
- I used a foam roller for a nice, even finish. You can also use a nap roller with a shorter nap that will easily glide across the smooth flooring surface.
- Focus on painting one small area at a time. The paint dries quickly, so ensure it’s evenly rolled before moving on to the next section.
- Let the base coat dry for at least six hours. If necessary, apply a second coat and let dry.
- Inspect your work and complete any necessary touch-ups. Let those dry for a couple hours before putting on the top coat.

Step 4
Apply top coat
- With the base coat completely dry, apply the clear top coat. Use the same painting technique as the base coat, working in sections and rolling out any brush marks.
- I was a little alarmed by how the top coat looks as it’s applied — bubbly and uneven. Don’t worry. It dries clear and even.
- If painting a high-traffic area, consider applying two coats for added durability. I did because our mudroom is used constantly. Wait one to two hours before applying the second top coat layer.

Step 5
Allow floor coating to dry
- After finishing the top coat application, wait 24 hours before walking on the surface. Use caution and only allow light foot traffic at this time.
- Wait three days before putting furniture on the floor.
- After seven days, the painted surface will be fully cured and ready for normal use.

FAQ
How durable are painted vinyl floors?
A painted vinyl floor is about as durable as any painted floor. “You will need to repaint it every two to three years,” Otto says.
Do I need a sealant for my painted vinyl floors?
If you use Rust-Oleum HOME, you do not need to add a sealer, because the product includes a clear topcoat. But even if you use a separate primer with porch paint on your floors, Otto says a sealant is not necessary. “Porch and floor paints are able to withstand foot traffic,” she says. “But if you really wanted to, you could put a polyurethane over the paint.”
About the Expert
- Rachel Otto is the paint department manager at Fleury Lumber in Easthampton, Massachusetts, specializing in Benjamin Moore products. She has 10 years of industry experience.