Create a calming space with this stylish planter.
Two days
Intermediate
$200
Introduction
Being surrounded by greenery relieves stress and brightens your mood. Set in this custom-size planter, foliage can brighten your decor too. Why not add one to your bathroom, bedroom or any living space? Fitted with pots, it lets you easily change out your plants whenever you’d like.
Tools Required
- Basic carpentry tools
- Brad Nailer
- Jigsaw
- Orbital sander
- Router
- Table saw or Circular saw
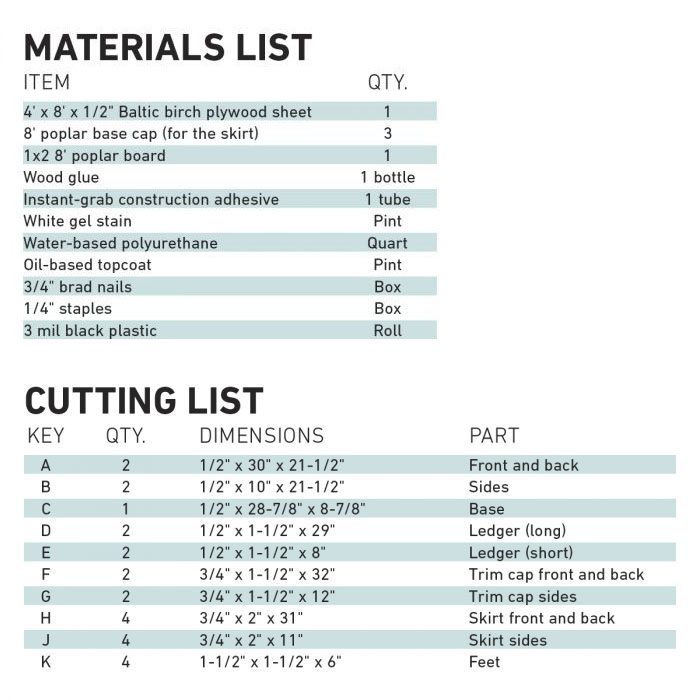
Materials Required
- 1/4" staples
- 1x2 8' poplar board
- 3 mil black plastic
- 3/4-in. brad nails
- 4' x 8' x 1/2" Baltic birch
- 8' poplar base cap
- Instant-grab construction adhesive
- Oil-based topcoat
- water-based polyurethane
- White gel stain
- Wood glue
Watch How To Make an Indoor Planter Box
Project step-by-step (13)
Step 1
Pre-finish sheet goods
- It’s faster to pre-finish a 4 x 8-ft. sheet than to do several small parts, and the finish is more consistent.
- After whitewashing the Baltic birch with white gel stain, I top-coated with a water-based polyurethane. Unlike an oil-based finish, it won’t yellow over time.

Step 2
Profile the edges of the trim cap
- Using a router, profile the nose of the cap.
- For this project I used a 3/8-in. round-over bit to create a simple, classic line.
- Sand all the parts to 180 grit.

Step 3
Stain trim to match
- Poplar is a good choice for the trim on this planter box—it’s readily available and works easily.
- To color-match the luxury vinyl flooring used for the bathroom tub deck, I started with a homemade iron oxide stain, followed by amber shellac.

Step 4
Apply finish to the trim boards
- Once all the trim boards are stained, apply two coats of clear finish.
- For the final step in my color-matching process, I chose an oil-based topcoat because it will imbue a slight yellow tone.

Step 5
Assemble the planter box
- You could use pocket holes and screws for this job, but the plywood end grain would show on the corners of the box.
- With a lock miter joint, you can get a continuous grain pattern as well as a strong glue joint.
- PRO TIP: This method requires a router table and a lock miter bit—and some patience. But this is a great joinery method to learn for this and other projects.

Step 6
Cut holes in planter base
- Using a jigsaw, cut three evenly spaced holes in the planter base.
- Size them according to your planter pots. Once the holes are cut, sand any rough edges and check the fit.
- The planter pots should slide in right up to the rim.

Step 7
Attach the ledger
- Position the ledger 1 in. down from the top. It will hold the planter base and you’ll staple the plastic liner to it in Step 9.
- Using a combination square as a guide, I used instant-grab construction adhesive and 3/4-in. brad nails to fasten the ledger parts.

Step 8
Attach the feet
- Position the feet to raise the planter box off the ground about 1-1/4 in.
- I used scrap wood from my shop and attached the feet with the instant-grab construction adhesive.

Step 9
Line the box with plastic
- This is an indoor planter box; line it with 3 mil plastic to prevent damage from overwatering.
- Staple the plastic to the front ledge first, then the back, leaving plenty of slack – do the sides last.
- Trim the excess with a utility knife.

Step 10
Paint the interior and base
- Because I planned to fill the top of the planter with black river rocks, I applied two coats of black oil-based paint to the base and inside edges of the box to make them less noticeable.
- Paint the inside to match the rock you choose.

Step 11
Attach the trim
- Using construction adhesive and brad nails, attach the skirt trim pieces.
- Do the cap first, then attach the upper and lower skirts.

Step 12
Fill planter top with river rock
- I found inexpensive black river rock at dollartree.com ($1 per 32 oz.).
- Cover the pots completely for a traditional planted look.

Step 13
Cutting List