


If you've had a deck for more than a couple years, chances are it'll need some work. After all, it spends 365 days a year exposed to the elements. Check out this collection of hints and tips for repairing and replacing deck parts, and adding some comfort, too.
31 Tips for Designing, Repairing, and Updating Your Deck
1
/
27

Check Your Deck
While well-built decks will last for decades it’s a good idea to perform an annual inspection on the whole structure to ensure everything is safe and in top shape for your family and guests. Problems to look for are rotted or wobbly posts, weak post connections, properly-fastened ledger boards, and missing flasher ledging. Most wood deck repair tasks are inexpensive and you should be able to complete them yourself.
2
/
27
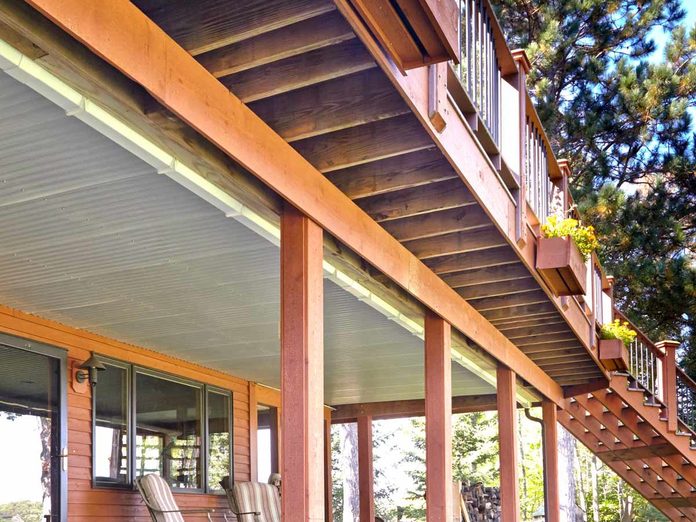
Install a Roof Under the Deck
If you have untapped space under your deck, you may be able to convert it into a dry, spacious second outdoor living area by building an under-deck roof that catches any water dripping through the deck boards and redirects it outside of the new patio area. Adding gutters, though optional, prevents the draining water from splashing onto the patio.
3
/
27

Build Your Dream Deck
A deck doesn’t need to be big in size to be big on features. We’ve got the plans for everything you’ve ever wanted in a deck: cantilevered seating nooks, a cedar pergola for shade, detailed horizontal railings, and cascading stairs, to name a few. It’s the perfect space to fire up the grill, read a book, enjoy breakfast, or set up a hammock for afternoon open-air naps. It’s a big project, but one that you could complete in about two weeks if you’ve got some carpentry skills and a buddy. We’ve mapped out all the steps you need to achieve this unique, dreamy outdoor space–take a look at our dream deck plans.
4
/
27

Shade Your Deck
You don’t have to let the blazing sun or drippy weather drive you indoors. This simple, covered pergola will keep you and your guests comfortable in any weather.
5
/
27
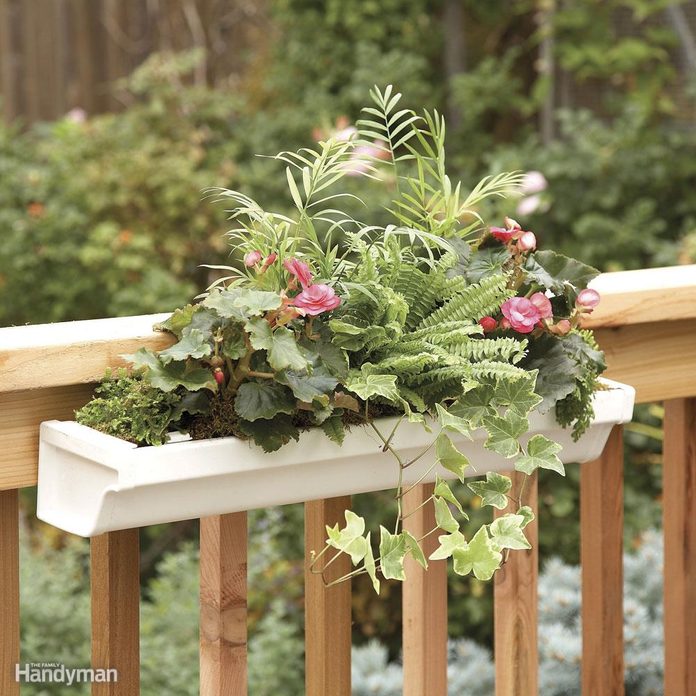
Railing-Mounted Deck Planter
In a little under an hour, you can make this simple railing-mounted planter. All you need is some standard gutter parts.
6
/
27

Enhance Decks with Lighting
Landscape lighting may seem like a complicated DIY project, but low-voltage lighting systems are actually a job any beginner can tackle. Low-voltage systems are much less dangerous than standard household wiring because the system relies on a transformer, which is plugged into a standard GFCI receptacle, to convert power from 120 volts down to 12 volts. The current travels through outdoor cables to supply power to the fixtures. And if you make your deck the focus, the extra visibility will even add a certain level of safety.
7
/
27
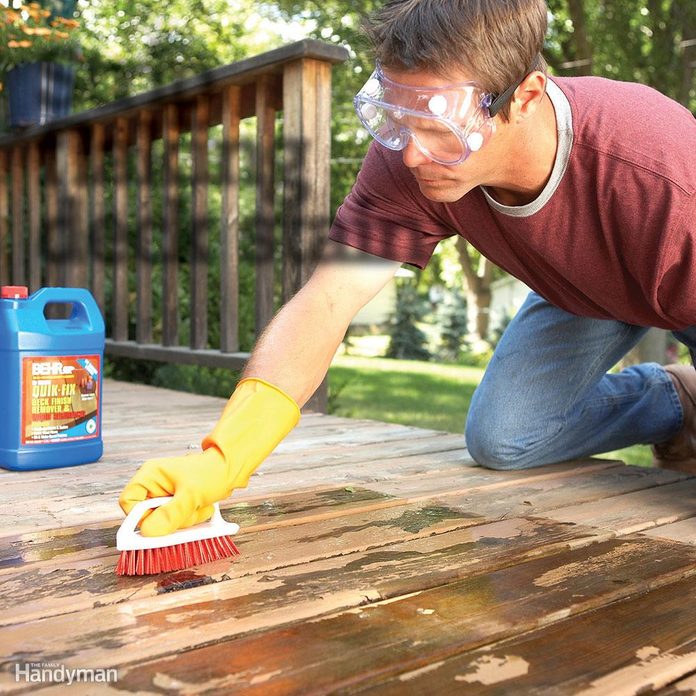
Refinish the Deck
When it comes to upgrading the overall look of your backyard, there’s no greater bang for your buck than to refinish your deck. Thorough prep is always the first step in any major ugly deck makeover project. Make sure to give the surface of the deck a good pressure wash and clean and remove any flaking deck stain. Then let the whole deck dry out thoroughly for several days. When your deck is ready for a new coat, select either a clear, solid, or penetrating stain. Penetrating stains will require more frequent coats in the future to stay looking new, but won’t need to be stripped off again like solid stains do. Just be sure to check the forecast and wait for a period of a few sunny days before you begin.
8
/
27
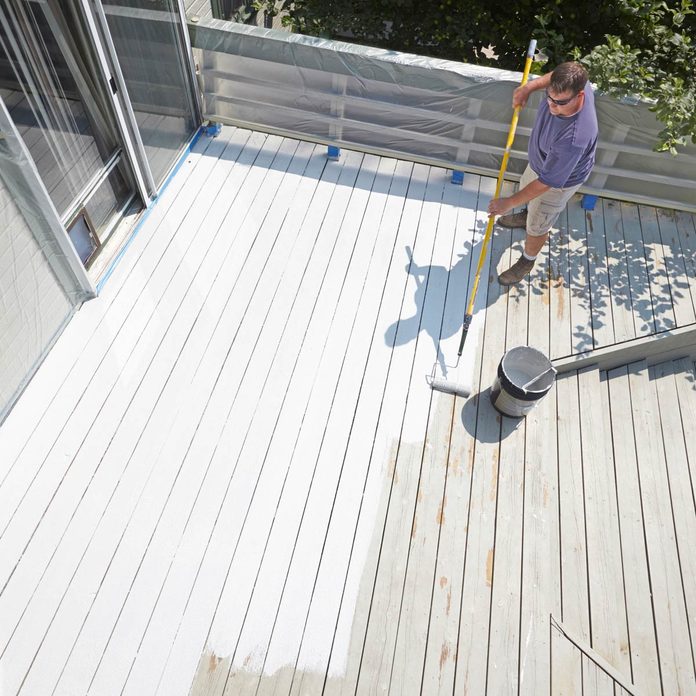
How to Restore Your Deck
After a few years, your deck is sure to show some wear and tear and make you feel like you have an ugly deck. Don’t rush to replace boards that are otherwise in good condition. With a deck restoration coating and just a few days in the sunshine, your deck will look as good as new.
9
/
27

Stiffen Wobbly Deck Railings
Deck posts and railings screwed to a single rim joist feel wobbly because the rim joist flexes whenever you lean against the railing. For an easy wood deck repair, add blocking. Adding blocking will stiffens the rim joist and makes the railing feel much more solid. Here’s how:
- First, tighten any loose bolts and screws. If the post doesn’t have bolts, add them—carriage bolts work best.
- Cut pressure-treated 2-by blocking (the same width as the floor joists) to fit tightly between the rim joist and the next joist.
- Place the blocking directly behind the post and toe-screw it into both the rim joist and the neighboring joist.
- Fasten additional blocking every 4-ft. along the rim joist.
10
/
27
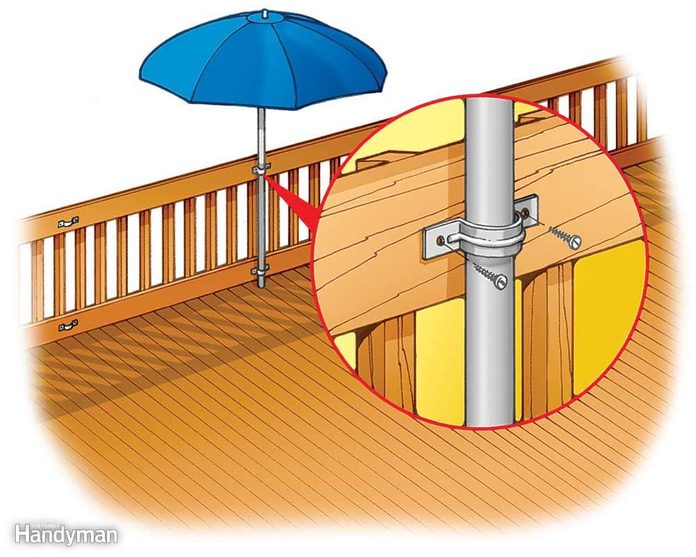
Movable Deck Umbrella
Does your deck umbrella always seem to be in the wrong spot to shade you from the sun? To help get it in the right spot, mount several sets of galvanized plumbing pipe straps on the deck posts or railing in key places. Use straps with a slightly wider diameter than that of the umbrella pole. Then slip the umbrella pole through the straps until the bottom of the pole rests on the deck. Now you can put shade right where you need it.
11
/
27
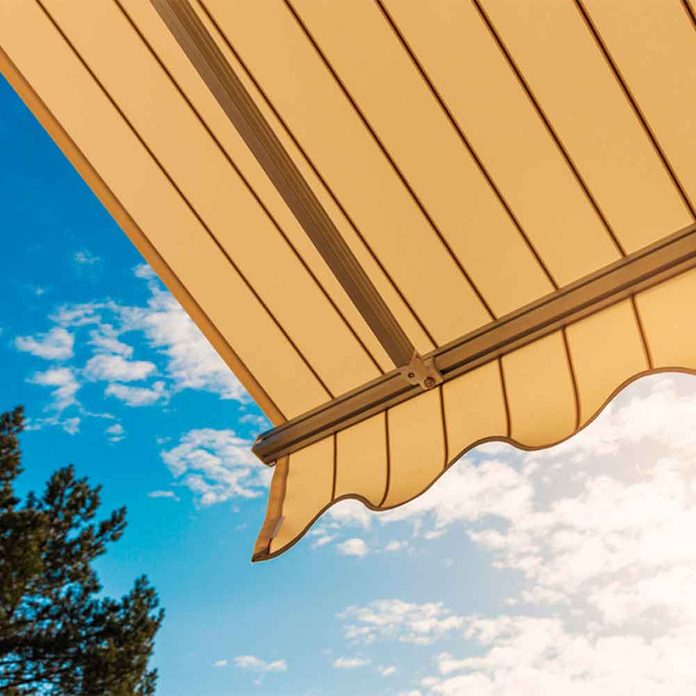
Add Shade With Canopies and Awnings
Sometimes that summer sun can get a little too warm, which is why building a canopy, awning or another type of shade is a great patio improvement project. These additions are affordable and easy to set up. Awnings and latticework, in particular, allow you to add more shade or remove shade based on the weather. Remember, shade over cooking and eating areas is most useful.
12
/
27
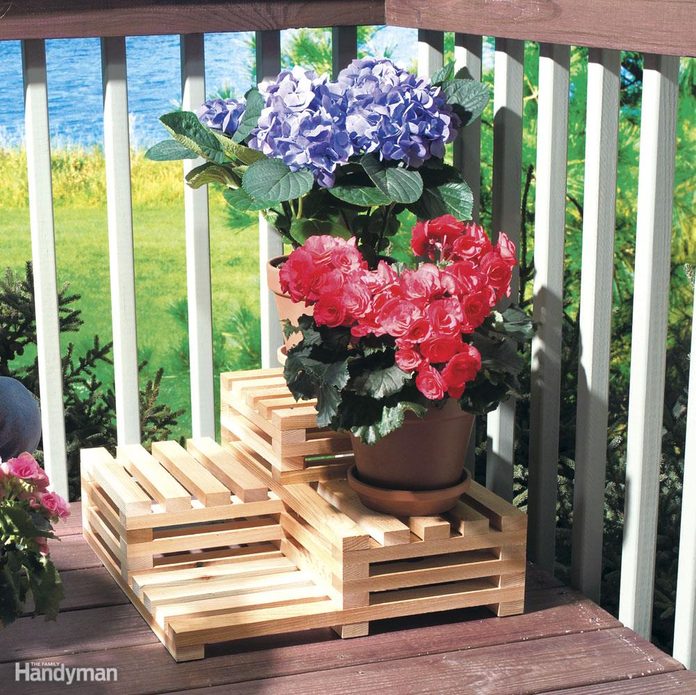
Tiered Plant Stand
Show off your gardening skills on your deck with this simple multi-level plant stand. It’s easy to build from seven 8-ft.-long 1x2s. In just one morning, you can build this handsome, durable plant stand, perfect for indoor use or outside on a deck or patio.
Get the plans for this tiered plant stand here.
13
/
27

Arbor and Benches
Build this simple seating/planter/arbor project to create a quiet, private space in your yard or on a deck. It provides shade and comfort as well as a welcome screen from neighbors. You can install it on an existing patio or build it on your deck. Get the full plans for this arbor and benches here.
14
/
27
Deck Board Spacers
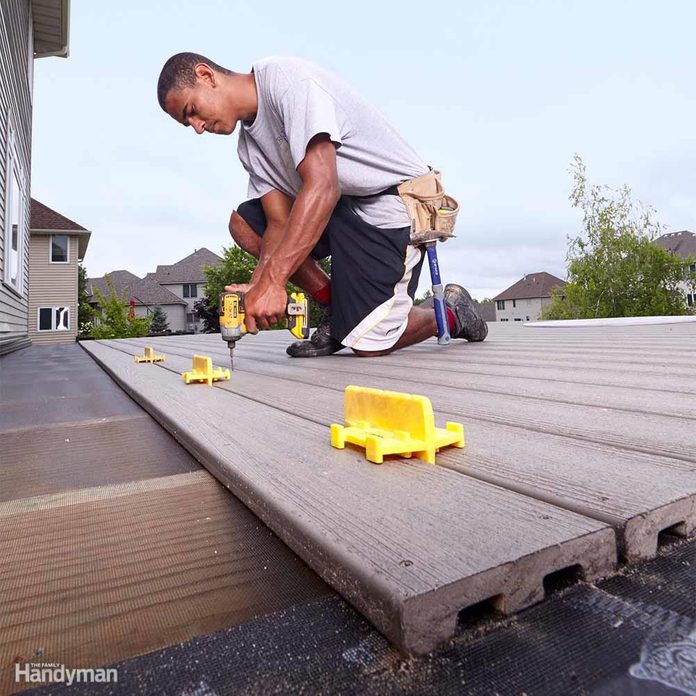
If you’re installing new deck boards on your deck and you want the gaps between the boards to be uniform, grab some spacers. Deck board spacers come in various sizes designed to maintain consistent gaps between each board of your deck. Large spacers like these work well because they’re easy to grab and pull out once a board is installed and they’re less likely to slip down between the boards. They’re also highly visible, which makes them less of a tripping hazard.
15
/
27
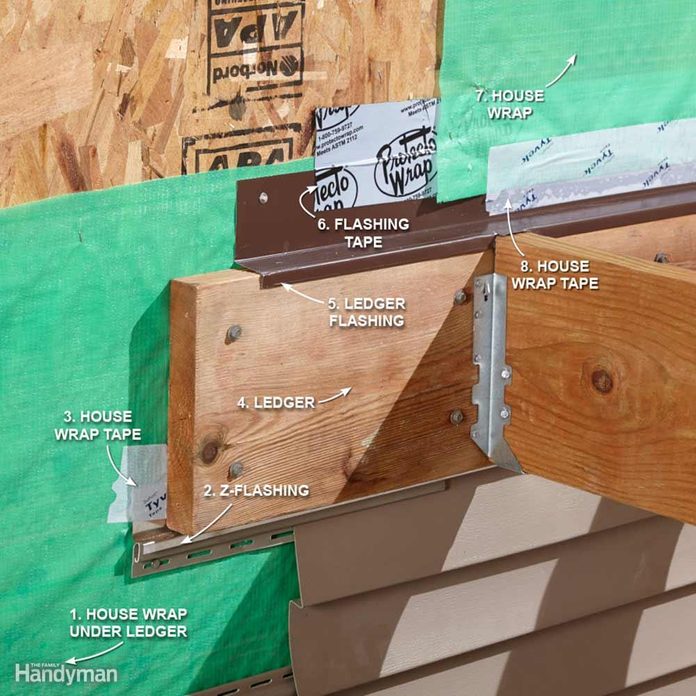
Best Way to Flash a Ledger Board
Deck ledger boards are a common source of water infiltration, and it can be years before you discover the damage caused by water finding its way behind the ledger and into your home. The process for flashing a ledger board (below) may seem a little excessive, but the extra time spent following these steps may save you thousands of dollars in repairs.
- Install house wrap on the wall several inches higher than where the top of the ledger board will be.
- Install Z-flashing approved for pressure-treated lumber where the bottom of the ledger will be.
- Cover the top of the Z-flashing with house wrap tape.
- Fasten the ledger board over the Z-flashing.
- Install flashing approved for pressure-treated lumber on top of the ledger.
- Cover the top of the flashing with window/door flashing tape.
- Install house wrap over the flashing.
- Fasten the house wrap to the wall with house wrap tape.
- Install the siding.
16
/
27
Tougher Decking
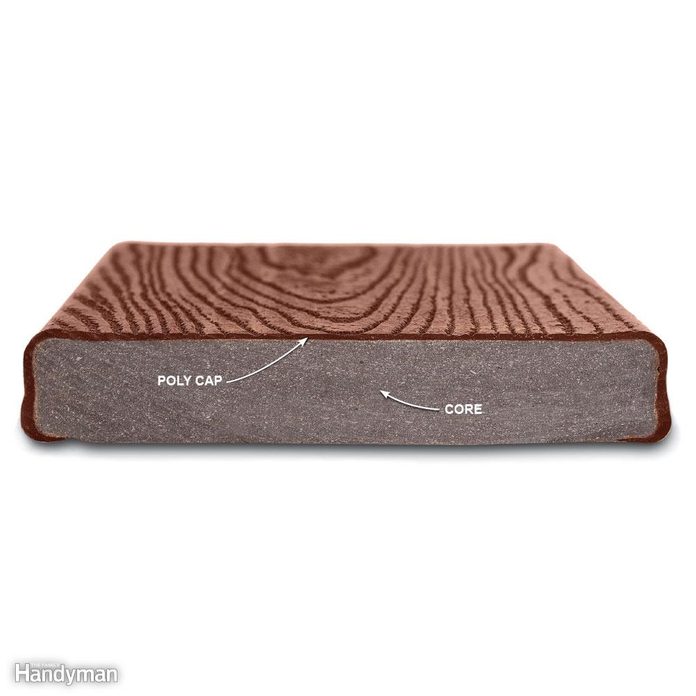
Just a few years ago, most manufactured decking was “composite,” which typically meant it was a combination of wood fibers and polymers. Composite was a big improvement over wood, but today most manufacturers offer something even better: “capped” or “shelled” decking.
The core of capped decking is similar to composite or made from cellular PVC, but that core is covered with a layer of denser, tougher polymer. That means better resistance to scratches, stains and fading. Brands that carry capped decking include Fiberon, Azek.com, TimberTech.com and Trex.com. Paying more usually gets you a thicker or tougher cap, plus deeper texturing and blended coloring for a more natural look. The decking shown, Trex Transcend, is made from 95 percent recycled material and includes a 25-year fade and stain warranty.
17
/
27
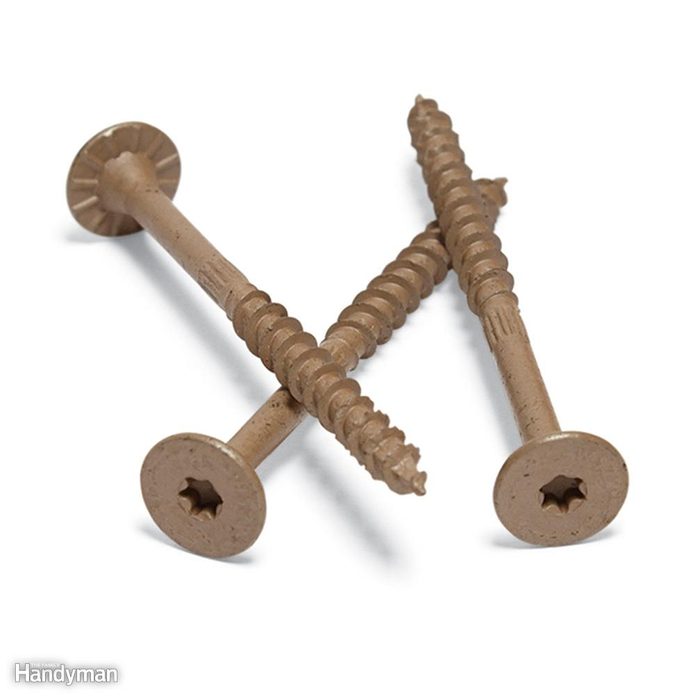
When to Use Structural Screws
Structural screws work great for hanging a ledger board and fastening thick framing members. The main advantage of structural screws over traditional lag screws is that they don’t need a pilot hole, which cuts the installation time in half! The Strong-Drive TIMBER Screws shown here have a low-profile head and are driven in with a large Torx bit. An 18-volt impact driver or 1/2-in. drill should be enough to get the job done.
18
/
27

Hide Ugly Deck Board Ends
The ends of manufactured deck boards are ugly, and you don’t want to leave them exposed. The good news is that there are a couple of ways to hide them.
The easiest solution is to raise the fascia board so the top is flush with the top of the decking. But keep in mind that most fascia/skirt boards are 11-1/4 in. wide, which means they aren’t wide enough to fully cover both the deck boards and a 2×12 joist.
Another way to hide the ends of your deck boards is to install a border/perimeter board around the outside edges of the deck). This method can really dress up your deck, especially if you choose an accent color for this board. The downside of a perimeter board is that it requires extra framing underneath.
19
/
27
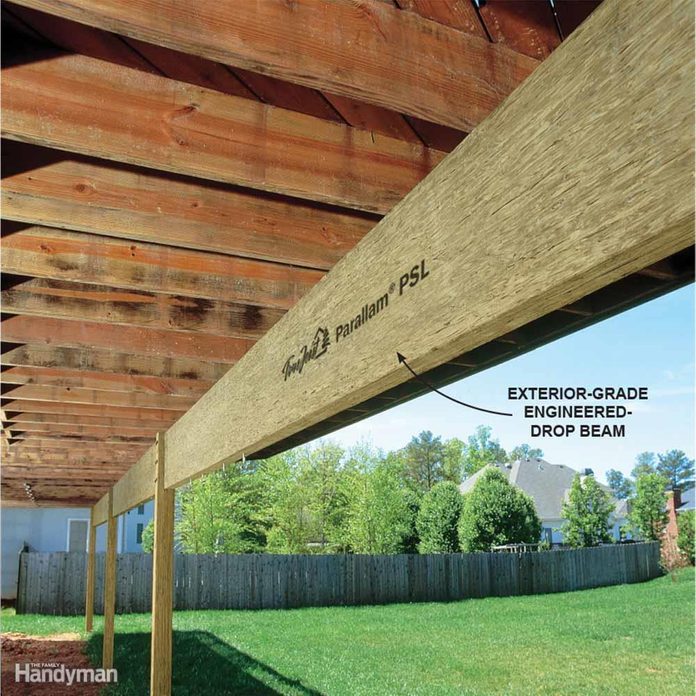
Use Engineered Lumber Outside
Engineered lumber has been used inside buildings for years because it’s stronger and straighter than regular lumber. Now there are versions for outdoor use. It may not be cost-effective to frame an entire deck with engineered lumber, but installing an engineered-lumber drop beam is a great way to reduce the number of posts and footings needed to support a deck.
20
/
27
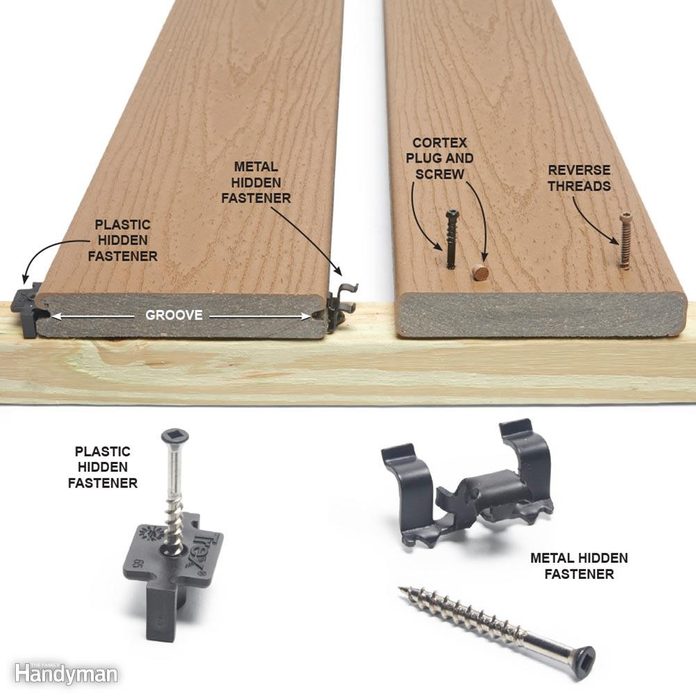
Deck Board Fastening Options
Screwing through the face of the boards is by far the fastest, easiest, and most structurally sound method of fastening deck boards. Modern deck screws have reverse threads to suck the decking down tight to the joists and specially designed heads to prevent mushrooming. Some face-screwing systems, like the Cortex system from FastenMaster, allow you to countersink the screws and fill the holes with plugs made out of the same material as the decking. Installing the plugs is time-consuming, but the fastener locations are almost invisible.
Some manufacturers design boards with grooves on the sides can be held down with hidden fasteners. Hidden fasteners are self-gapping and easy to install, and you can’t beat them if you want a nice, clean look.
21
/
27

Avoid Deck Rot with Flashing Tape
Pressure-treated lumber that stays wet will eventually rot. Flashing tape keeps water from getting trapped between doubled-up joists. If you’re resurfacing an existing deck frame, tape over any joists that have a lot of holes from the previous nails or screws. Buy black tape if you can find it; shiny silver and white tapes may be noticeable between the gaps in the decking. The tape shown will be covered by the perimeter deck board.
22
/
27
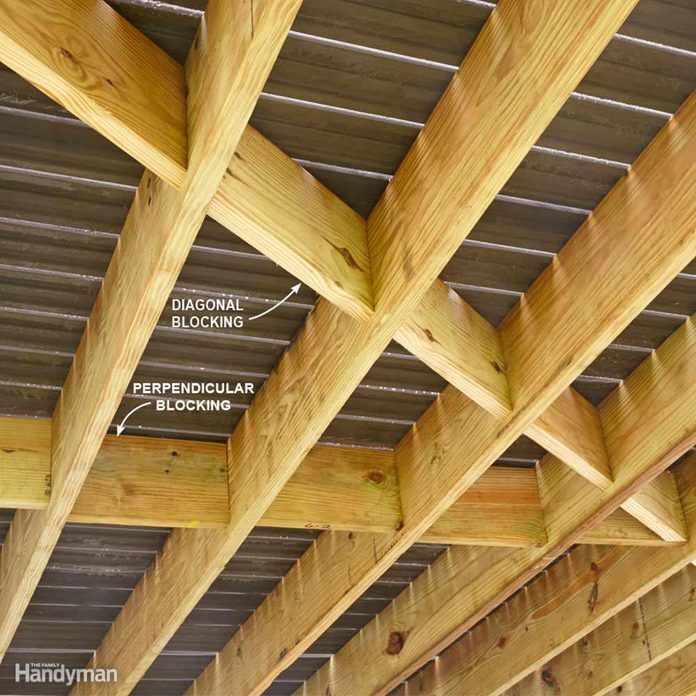
Blocking Keeps Decks Flat and Square
Manufactured decking allows joists to bow a bit because it isn’t quite as stiff as wood decking, which can lead to a wavy deck surface. To help keep joists flat, always attach blocking perpendicular to the joists. Also, install diagonal blocking to keep the entire frame from racking. Use narrower lumber (2×8 blocking on 2×10 joists) so the blocking looks less conspicuous from a distance. Once everything is secure, run a string on the top side of the joists and plane down the remaining high spots.
23
/
27
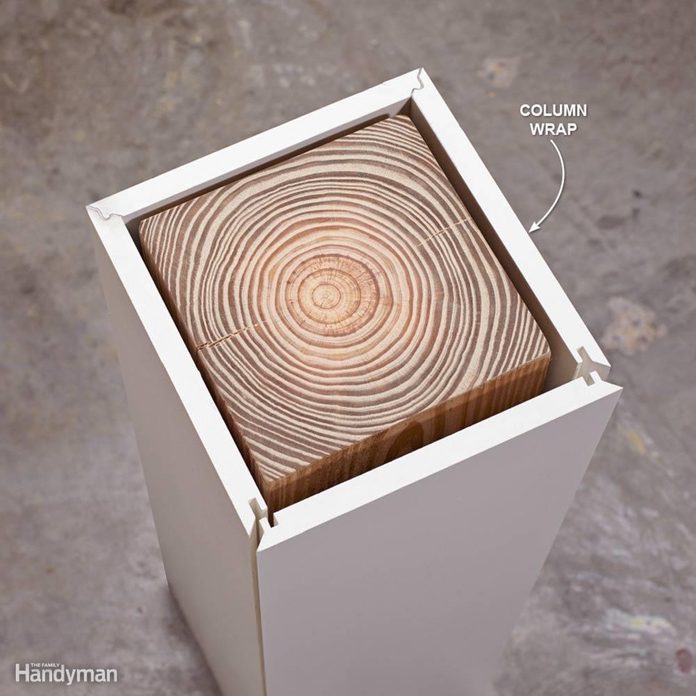
Maintenance-Free Deck Posts
One way to spruce up deck posts is to cover them with a maintenance-free material like AZEK’s PVC Column Wrap, which is super easy to install. Simply glue together three sides, slide them over the post, glue and clamp the last side in place, and then never worry about painting or staining again.
24
/
27
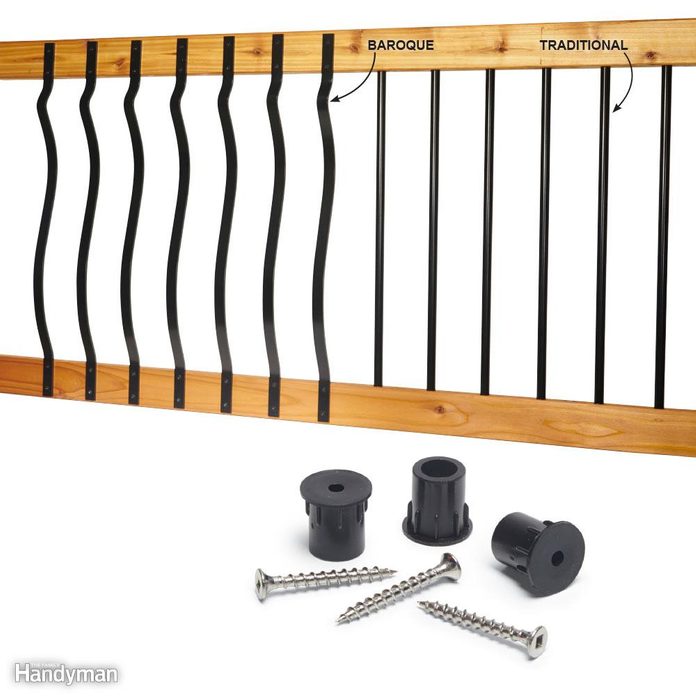
Maintenance-Free Deck Balusters
New metal balusters can give your existing wood deck a sleek, modern look. These two options are made by Deckorators. The Baroque Balusters are simply screwed to rails. The round Classic Balusters are held in place by hidden connectors that require no hole drilling. Deckorators balusters don’t need to be painted or stained, which is probably the most tedious deck maintenance task there is.
25
/
27
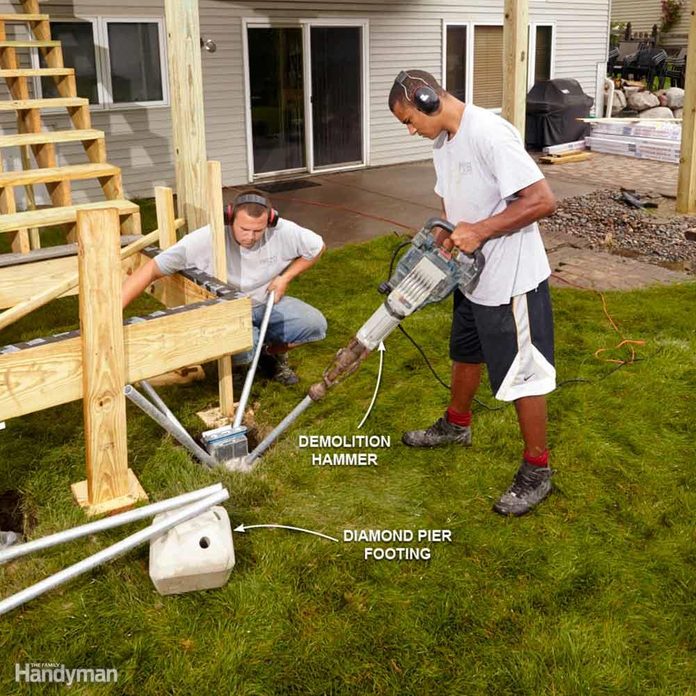
No-Dig Deck Footings
Some pros have given up constructing concrete deck footings. Instead, they’re using the Diamond Pier foundation system. To install a Diamond Pier footing, just drive in four pipes with a demo hammer. That eliminates a ton of digging and concrete work.
The standard deck model is the DP-50. Most home centers and lumberyards that carry this product will also have breaker hammers you could borrow or rent. Check out the videos at pinfoundations.com.
26
/
27
Precision Deck Screw Sinker
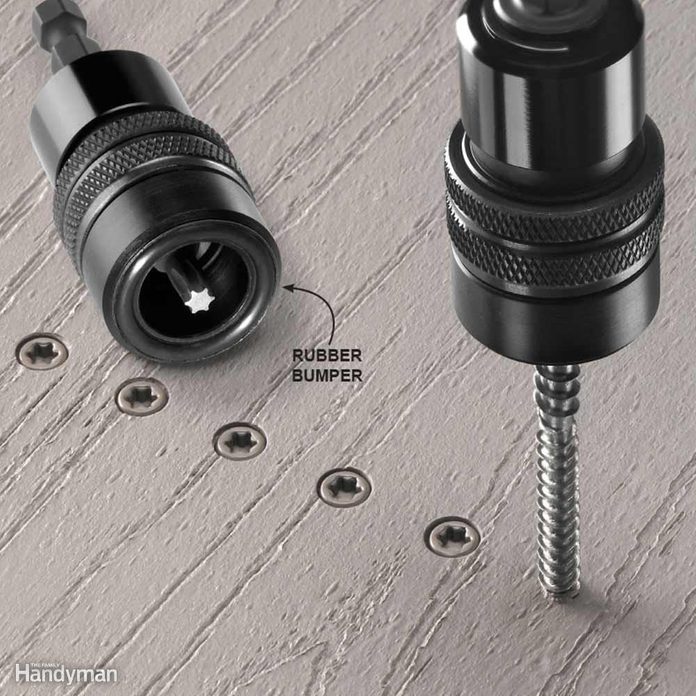
When you’re screwing in decking, this Smart-Bit Deck Screw Depth Setter is a great tool to make sure all the screws are set at a consistent depth. The type of bit can be changed to match the screws, and the depth of the screws can be adjusted. This tool also has a free-spinning collar with a rubber bumper to prevent marring.
27
/
27

Water-Shedding Composite Decking
DuxxBak decking is a unique composite decking that doesn’t allow water to pass between the deck boards, keeping the area under the deck dry. A dry space under the deck is a great place to continue your deck party during a rain shower, or to create some useful dry storage.
In order to channel the water away, the decking needs to run perpendicular to the house, so remember to install the framing joists parallel to the house. And make sure the substructure has enough slope to carry the water away.
Go to greenbaydecking.com to find more information on DuxxBak and locate a dealer.