


If you're looking for some DIY cabinet organizer inspiration, you've come to the right place. We've got several easy options for you to try.

10 Easy DIY Projects To Increase Kitchen Cabinet and Drawer Storage
1
/
11
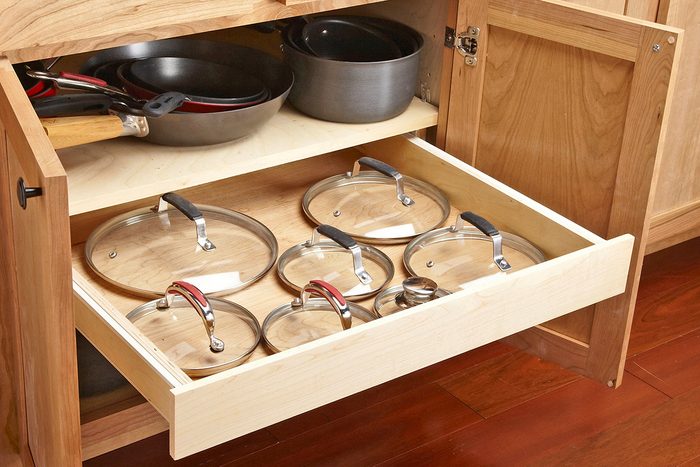
Rollout Drawer for Lids
One of the best DIY cabinet organizer projects is a corral for your pot lids. You can mount a drawer for them under your pot shelf—or under any other cabinet shelf. Here’s how:
- Before you remove the shelf, put some pencil marks on it to indicate the width of the cabinet opening at its narrowest point (usually at the hinges). Your drawer front and slides can’t extend beyond those marks or you’ll spend hours building a drawer that won’t open.
- Then remove the shelf. If it’s made from particleboard, we recommend that you replace it with 3/4-in. plywood and transfer the marks to the new shelf.
- If you can build a simple drawer box, the rest will be easy. Mount the drawer on cleats screwed to the cabinet sides.

2
/
11
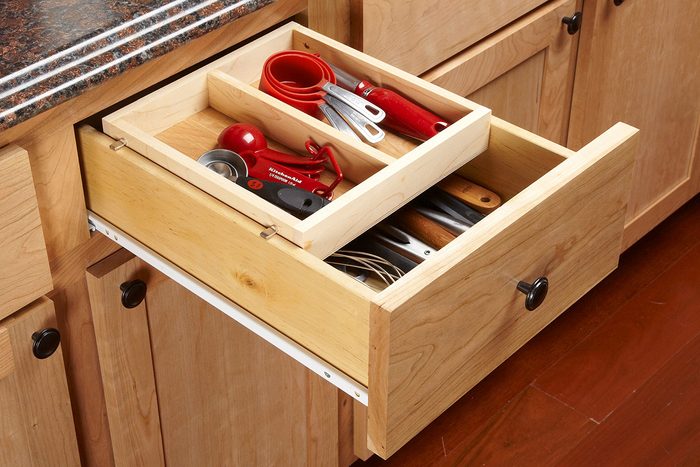
Drawer in a Drawer
Deep drawers often contain a jumbled pile of interlocking utensils. Our solution is a sliding tray that creates two shallower spaces. Make it 1/8-in. narrower than the drawer box, about half the length and any depth you want. Ours is 1-3/4-in. deep.
When you position the holes for the adjustable shelf supports, don’t rely on measurements and arithmetic. Instead, position the tray inside the drawer box at least 1/8-in. lower than the cabinet opening and make a mark on the tray. Our shelf supports fit tightly into the holes, but yours may require a little super glue. This simple drawer rests on shelf supports.

3
/
11
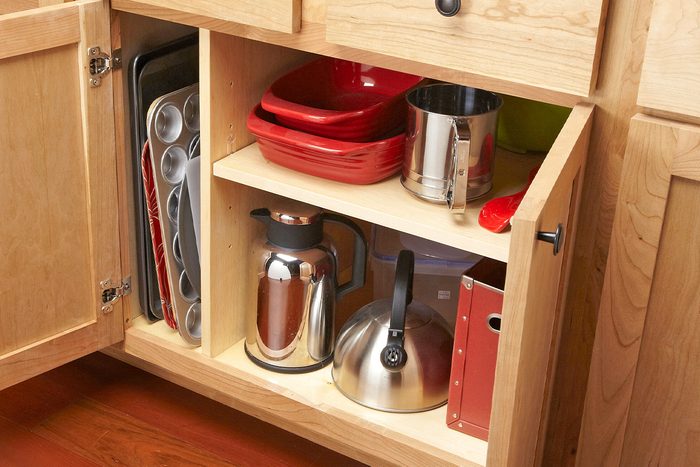
Add a Divider for Upright Storage
Of course the pan or tray you need is always the one at the bottom of the pile! There’s an easy solution: a DIY cabinet organizer. It will allow you to store large, flat item on their edges rather than stacked up. That way, you can slide out whichever pan you need.
- Cut 3/4-in. plywood to match the depth of the cabinet, but make it at least an inch taller than the opening so you can fasten it to the face frame as shown.
- Drill shelf support holes that match the existing holes inside the cabinet.
- Screw two brackets to the cabinet floor; one to the face frame and one to the back wall of the cabinet (not shown).
- Finally, cut the old shelf to fit the new space.

4
/
11

Rollout Storage Panel
If you know how to mount a slab of plywood on drawer slides, you can take advantage of all the nifty shelves, hooks and holders sold at home centers. Utilizing them will help keep small stuff from getting lost in deep base cabinets.
It’s easy as long as you remember two critical things: First, make sure the drawer slides are parallel. Place a plywood spacer between the drawer members as you screw them to the panel. Screw the cabinet members to cleats. Second, make your cleats thick enough so that the slides will clear the cabinet door hinges. We glued 1/2-in. plywood to 3/4-in. plywood to make the cleats.
To install the panel in the cabinet, reassemble the slides. Hold the whole assembly against the cabinet wall and slide the panel out about 4 in. Drive screws through the cleats at the rear, then slide the panel out completely and drive screws at the front.

5
/
11
Cutting Board Storage
To store cutting boards, mount a rack on a cabinet door. Use a sheet of 1/4-in.-thick acrylic plastic; though plywood would also work. You can cut acrylic with a table saw or circular saw as long as you cut slowly. Knock off the sharp edges with sandpaper. Round the lower corners with a belt sander. For spacers, we used No. 14-8 crimp sleeves, but any type of tube or even blocks of wood would work.

6
/
11

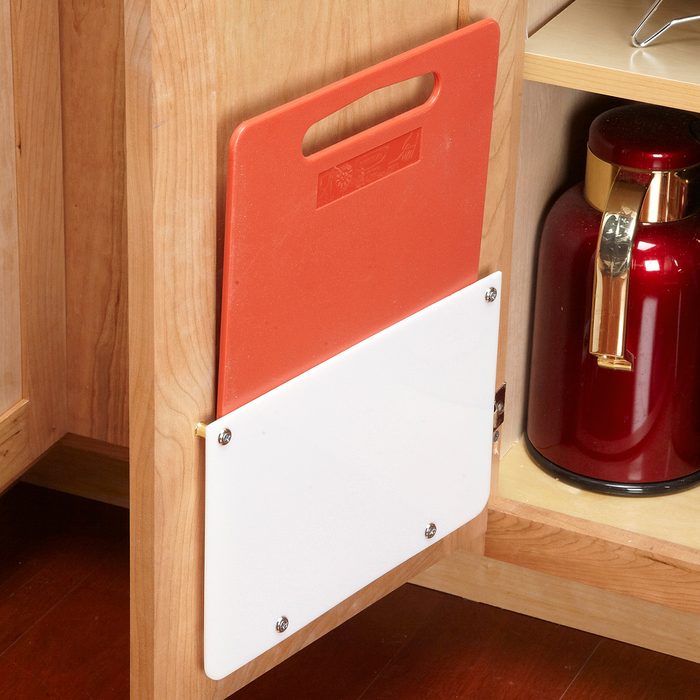
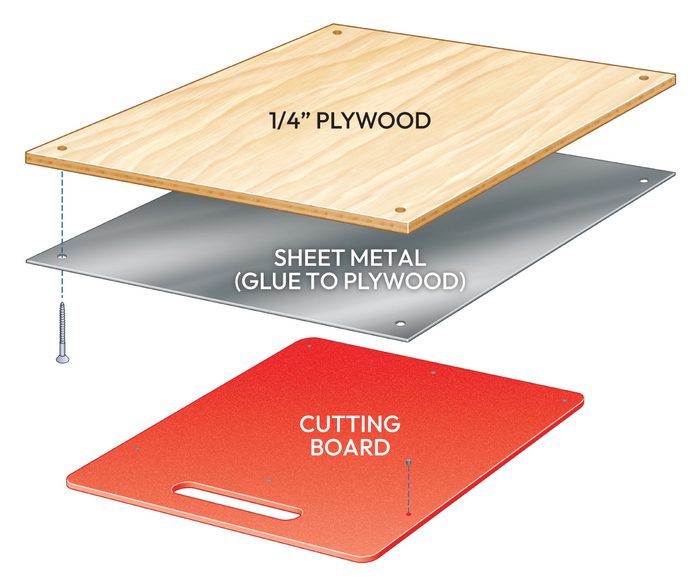
Hidden Cutting Board
The main thing you’ll need for this DIY cabinet organizer is a few small magnets. Implant the magnets at the corners of your cutting board and add more if needed. Make the metal plate under the cabinet larger than the cutting board so the board will be easy to put away. Glue the sheet metal to plywood with spray adhesive. Make sure you use galvanized steel, not aluminum.
Drill holes near the corners and screw the plywood to the underside of a cabinet. Drill holes sized for the magnets and drop in a dab of super glue. Insert the magnets with a nail head. Slide the nail sideways to release the magnet. The metal plate grabs the magnets.
7
/
11
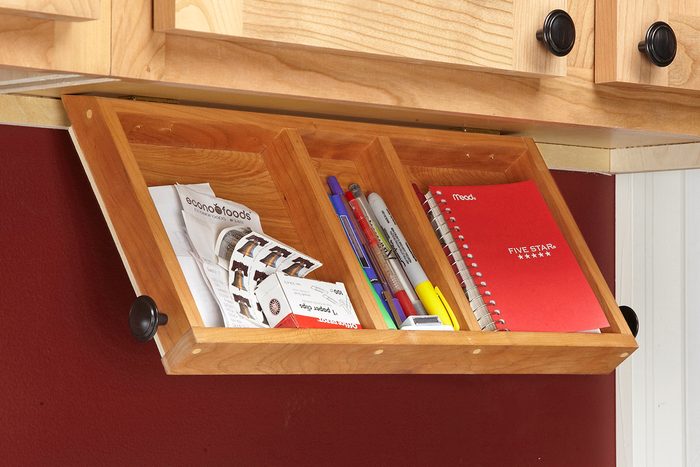
Flip-Down Paper Tray
This tray is perfect for pens and paper. When closed, it’s mostly hidden by the cabinet face frame. Hinges and magnets hold this tray in place under an upper cabinet. To install the tray, screw on the hinges first. Then open the cabinet door above and clamp the tray to the underside of the cabinet while you screw the hinges to the cabinet.

8
/
11
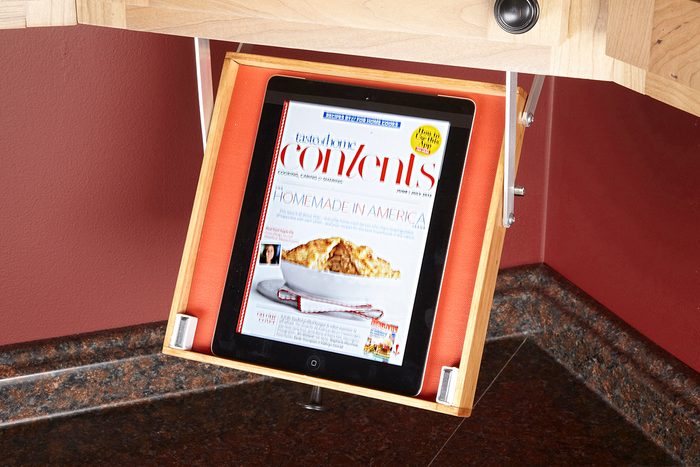
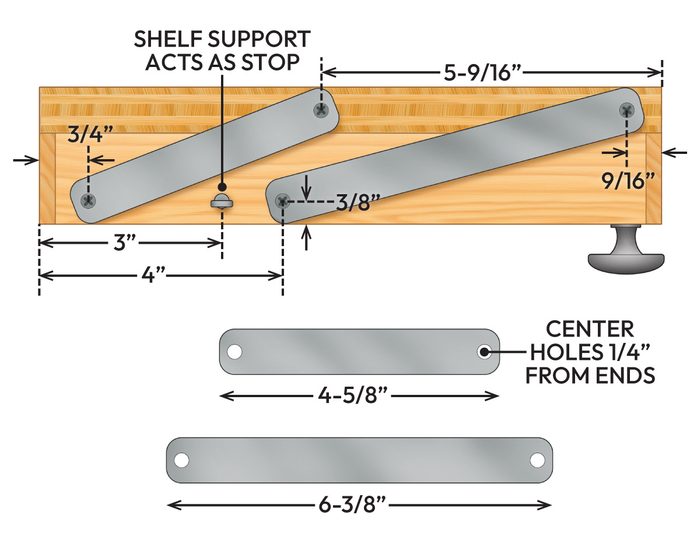
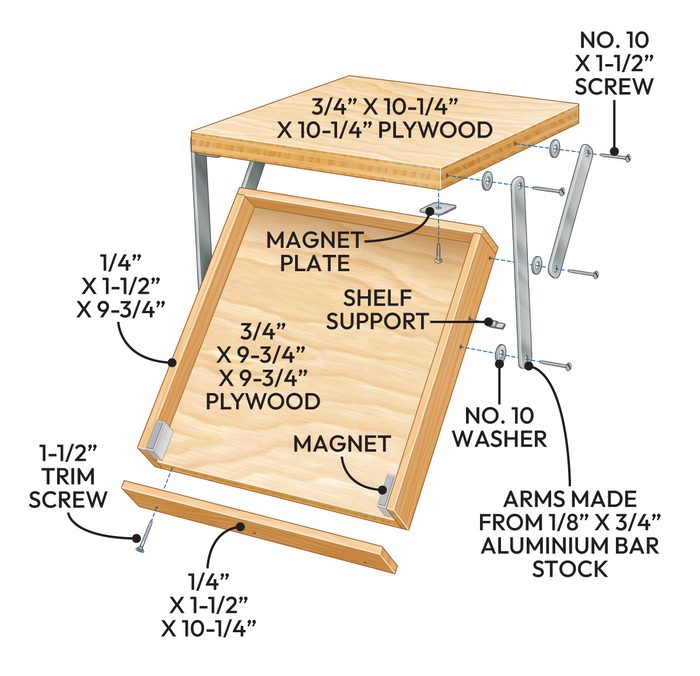
Drop-Down Tablet Tray
Keep your tablet handy and safe while you’re working in the kitchen. This tray will keep your tablet or other devices off the countertop. As it swings down, it also swings forward, so the tablet isn’t hidden under the cabinet. The mechanism is simple; just make and position the arms exactly as shown here and it will work smoothly.
We cut the aluminum parts and rounded the corners with a grinder. When closed, small cabinet door magnets hold up the tray. We clipped the plastic ears off the magnets and glued the magnets into place with epoxy. The liner in the tray is a foam placemat cut to fit. The shelf folds up against a plywood top and is a good option to organize your kitchen cabinet. Aluminum arms hold the tray in position. Don’t worry, small magnets won’t harm your tablet.
9
/
11
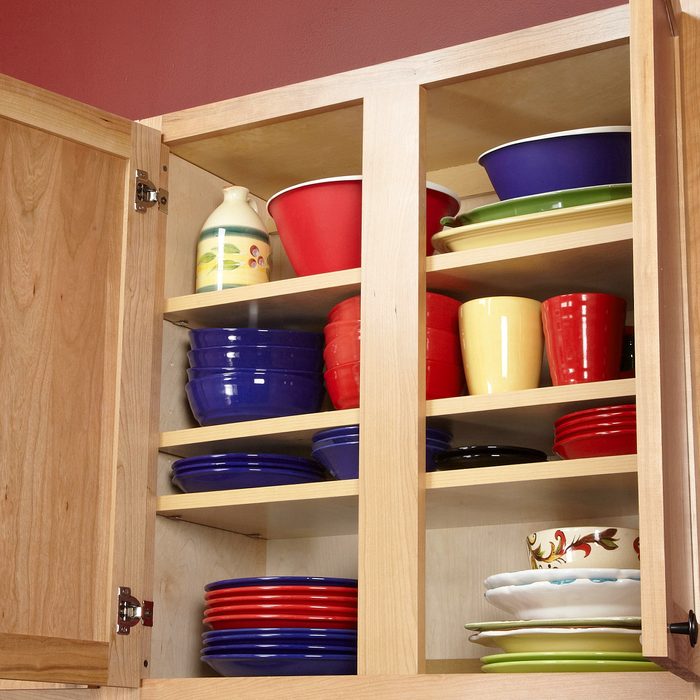
Add a Shelf
This DIY cabinet organizer project provides more space for plates and bowls in crowded kitchen cabinets. Most cabinets come with only one or two shelves, leaving a lot of wasted space. You can get more storage by adding one or two shelves to most of your cabinets. All it takes is 3/4-in. plywood and a bag of shelf supports. The supports come in two diameters, so take an existing one to the store to make sure you get the right size.
10
/
11
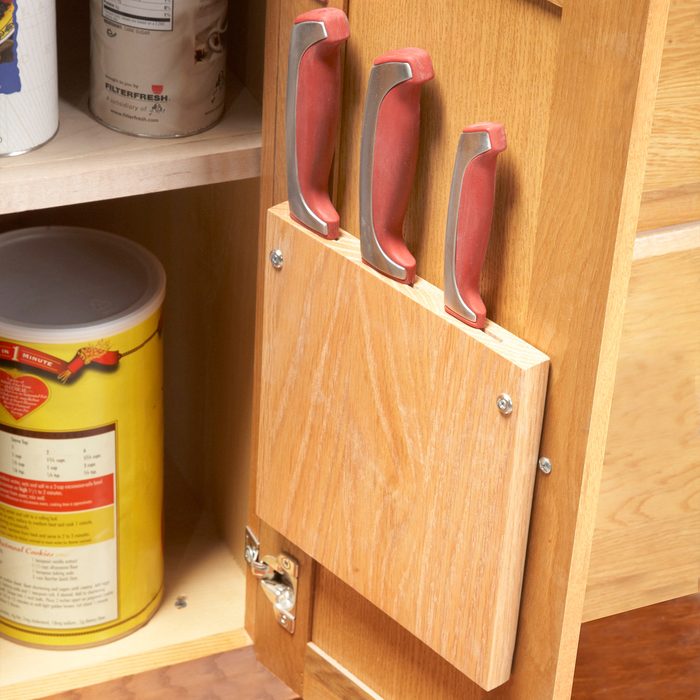
Cabinet Door Knife Rack
You can size this knife rack to suit any cabinet door and any number of knives for kitchen cabinet storage. To build this cutting board turned knife rack, you just need a table saw and wood scraps.
- Run the scraps across the saw on edge to cut kerfs.
- Adjust the blade height to suit the width of the knife blades. You have to remove the saw’s blade guard for these cuts, so be extra careful.
- Also cut a thin strip to act as an end cap.
- Glue and clamp the kerfed scraps together and sand the knife rack until the joints are flush.
- To mount it, use two 1-1/4-in. screws and finish washers.

11
/
11

Drawer Dividers
This DIY drawer divider project isn’t limited to your wardrobe. You can modify the cuts to be customized to your drawer organization. Keep your measuring cups corralled, solidify your spatula organization system, and save yourself the hassle of a jammed drawer.