


These inexpensive, easy-to-build cabinet projects will help you take advantage of every nook and cranny of your kitchen storage space.
30 Cheap Kitchen Cabinet Add-Ons You Can DIY

Updated on Sep. 13, 2024
1
/
30
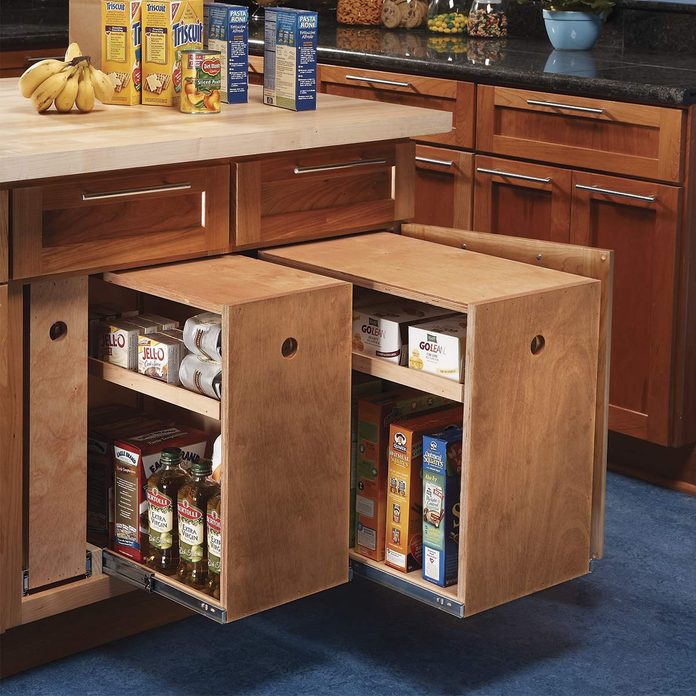
Lower Cabinet Rollouts
Vertical rollout drawers are a great way to convert a half-empty base cabinet into a high-capacity food storage cabinet that can be custom-sized to fit your storage needs. These drawers are easy to build yourself with these step-by-step plans.
2
/
30
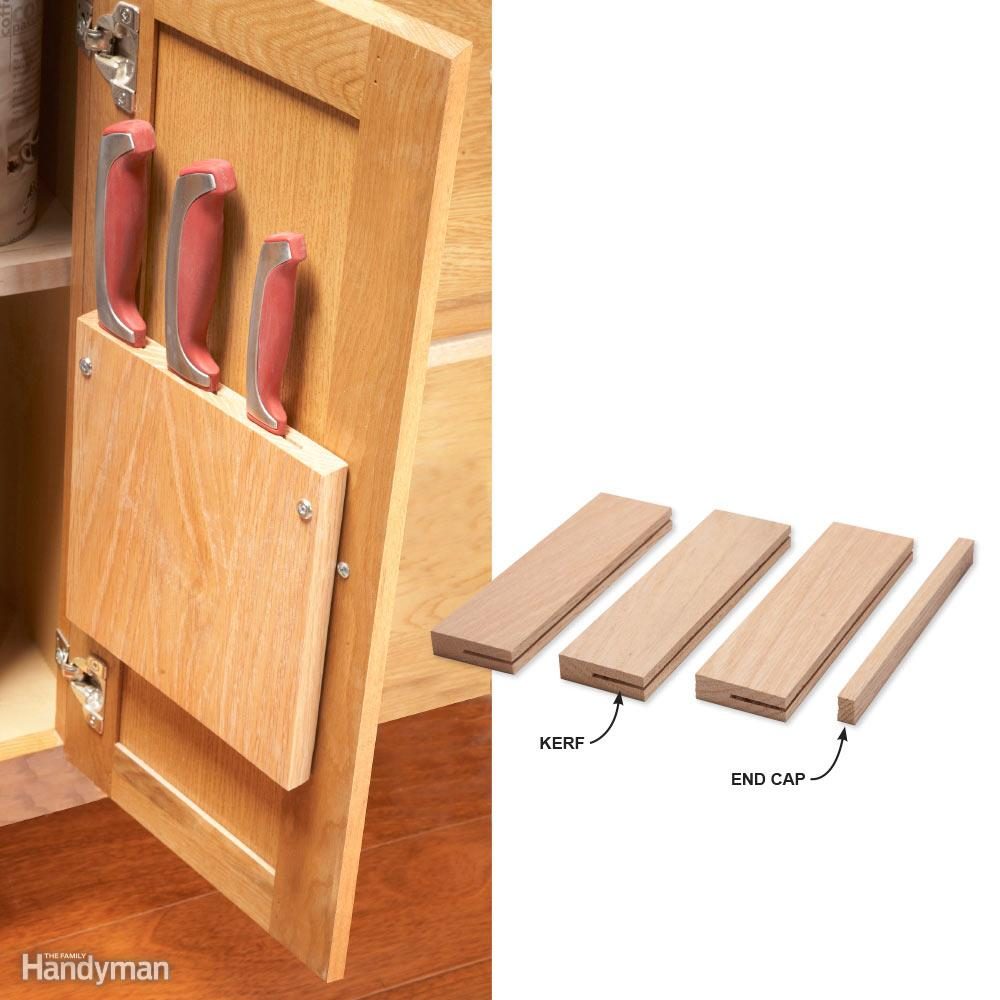
Kitchen Storage: Cabinet Door Knife Rack
You can size this knife rack to suit any cabinet door and any number of knives for kitchen cabinet storage. To build this cutting board turned knife rack, you just need a table saw and wood scraps. Run the scraps across the saw on edge to cut kerfs. Adjust the blade height to suit the width of the knife blades. You have to remove the saw's blade guard for these cuts, so be extra careful. Also cut a thin strip to act as an end cap. Glue and clamp the kerfed scraps together and sand the knife rack until the joints are flush. To mount it, use two 1-1/4-in. screws and finish washers.
3
/
30
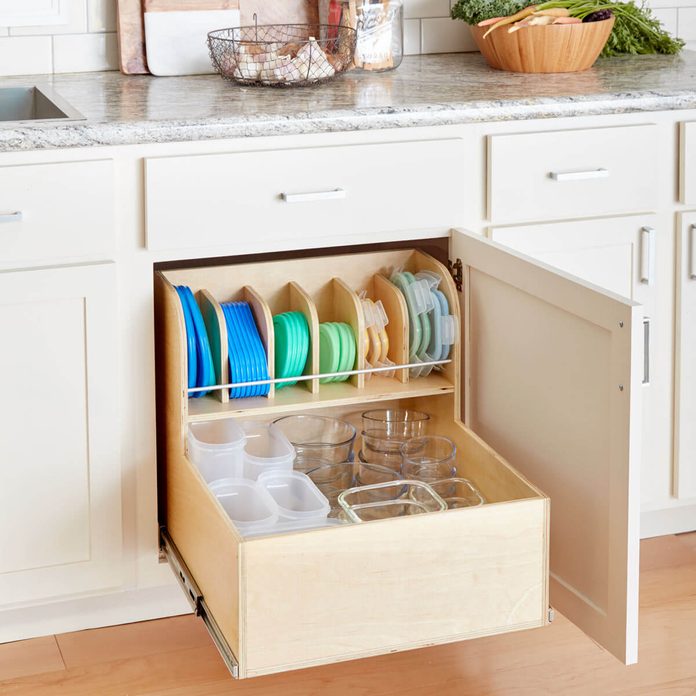
The Ultimate Container Storage Drawer
It’s always a challenge to find matching containers and lids. This rollout solves the problem by keeping them all neatly organized and easily accessible. The full-extension drawer slides are the key. To simplify tricky drawer slide installation, we’ve designed an ingenious carrier system that allows you to mount the slides and make sure everything is working smoothly before the unit is mounted in the cabinet. Get the full project plans here.
4
/
30
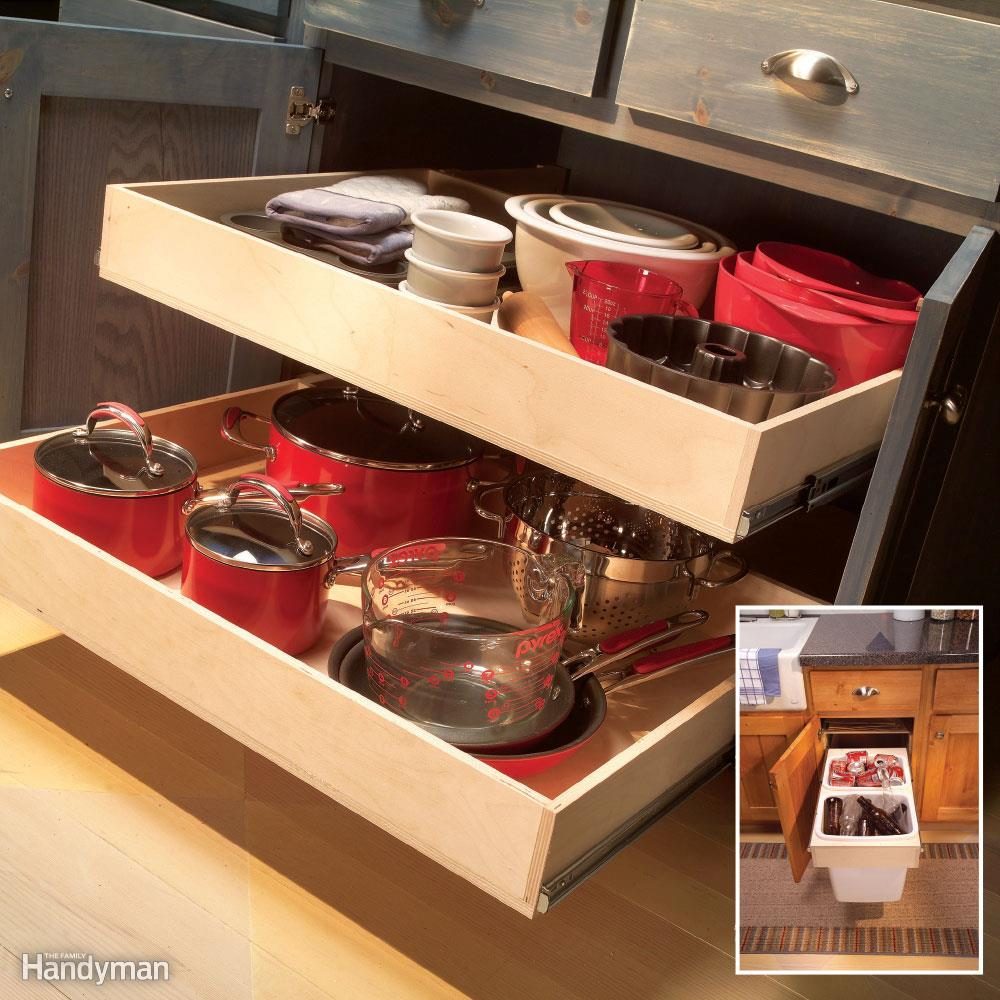
Build Classic Rollouts Plus a Trash Center
Base cabinets have the least convenient storage in your kitchen. We'll show you how to bring everything in your cabinets within easy reach by retrofitting your base cabinets with classic rollout shelves. This tutorial shows how to construct a special rollout for recycling and trash without using expensive bottom-mount hardware. Get step-by-step instructions for measuring, building the rollout drawer and its carrier, attaching the drawer slides, and mounting the unit in the cabinet.
Psst! Check out these unique kitchen cabinet hardware ideas.
5
/
30
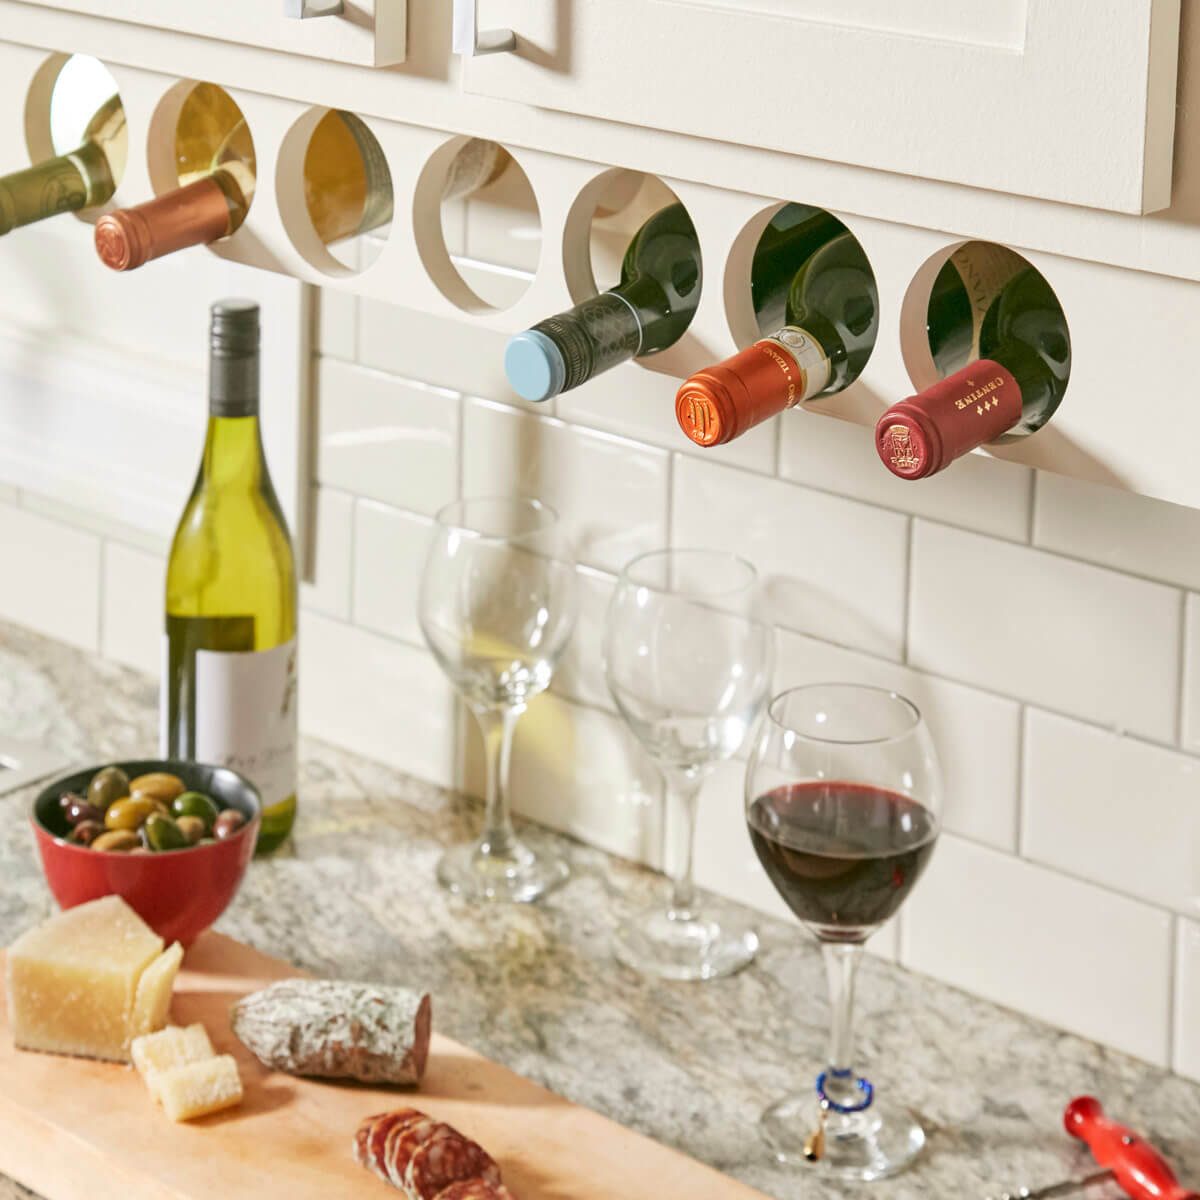
Under-Cabinet Wine Rack
There's a lot of usable space below many upper kitchen cabinets, and it's the perfect place to store your favorite vintages. This easy-to-build wine rack requires just two 1x4s the length of the under-cabinet bay and a strip of 3/4-in. plywood that same length and 8 in. wide. Click here to get the full build a wine rack project plans.
6
/
30
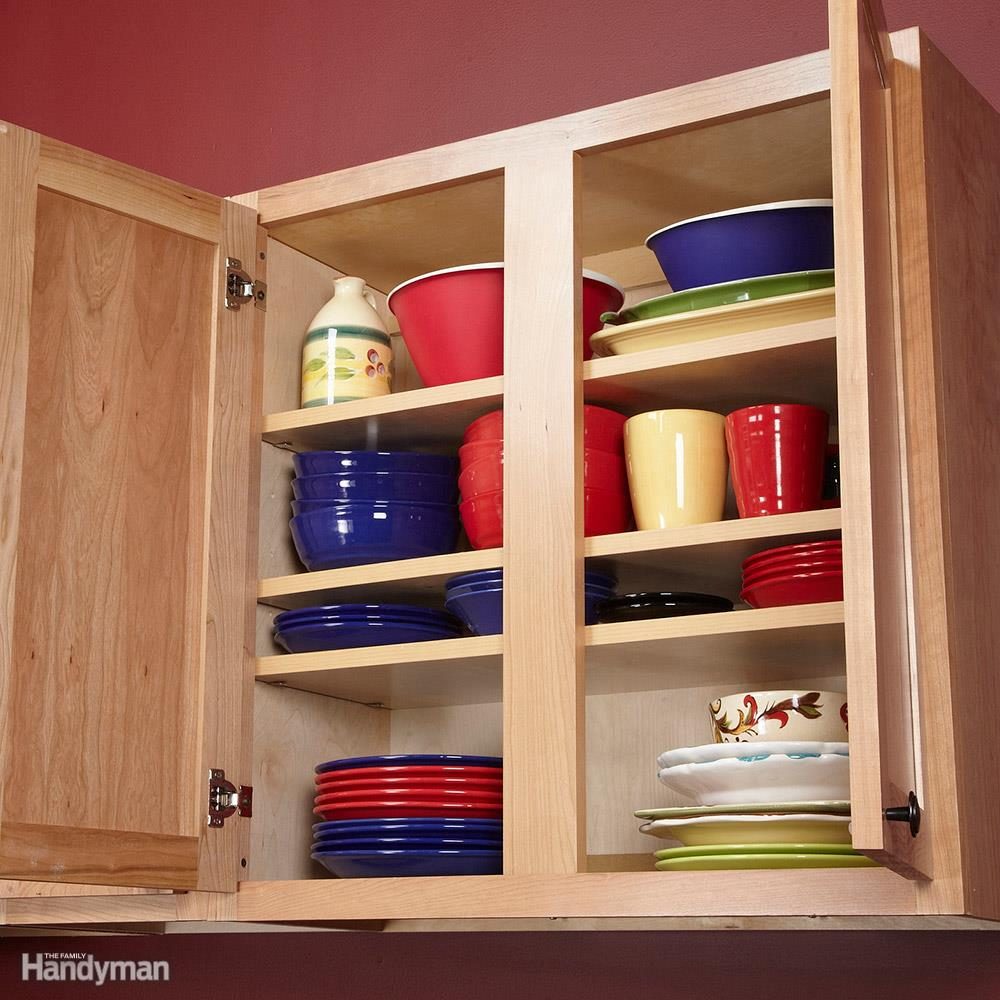
Kitchen Storage: Add a Shelf
This kitchen cabinet storage project provides more space for plates and bowls in crowded kitchen cabinets. Most cabinets come with only one or two shelves, leaving a lot of wasted space. So we added one (and sometimes two) shelves to most of our cabinets. All it takes is 3/4-in. plywood and a bag of shelf supports. The supports come in two diameters, so take an existing one to the store to make sure you get the right size. Check out our guide to kitchen cabinet dimensions.
Also, find out how to fix sagging shelves.
7
/
30
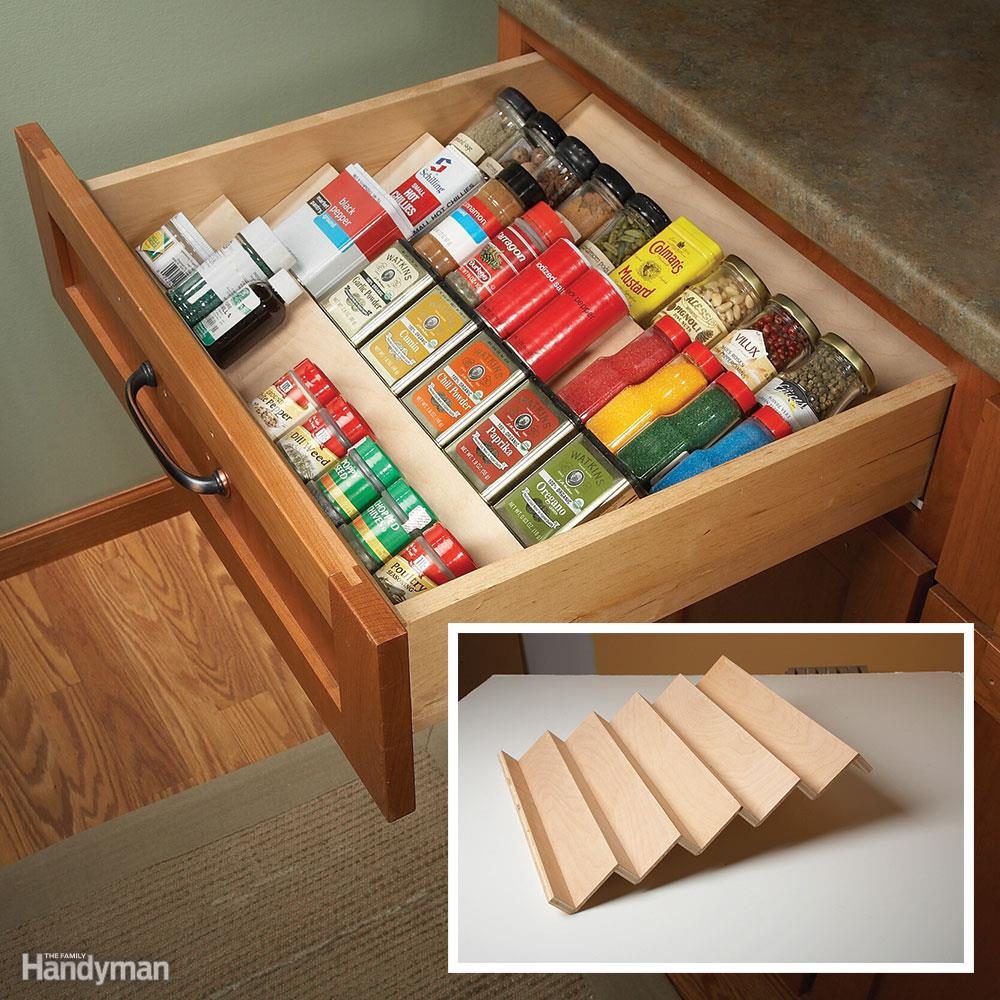
Spice Storage Drawer
If your spices are jammed into a drawer with only the tops visible, this nifty rack that slips neatly into the drawer will solve the problem. And it only takes an hour to build. Make it with scraps of 1/4-in. and 1/2-in. plywood. Or build a two-tier drawer spice rack into your kitchen drawer.
8
/
30
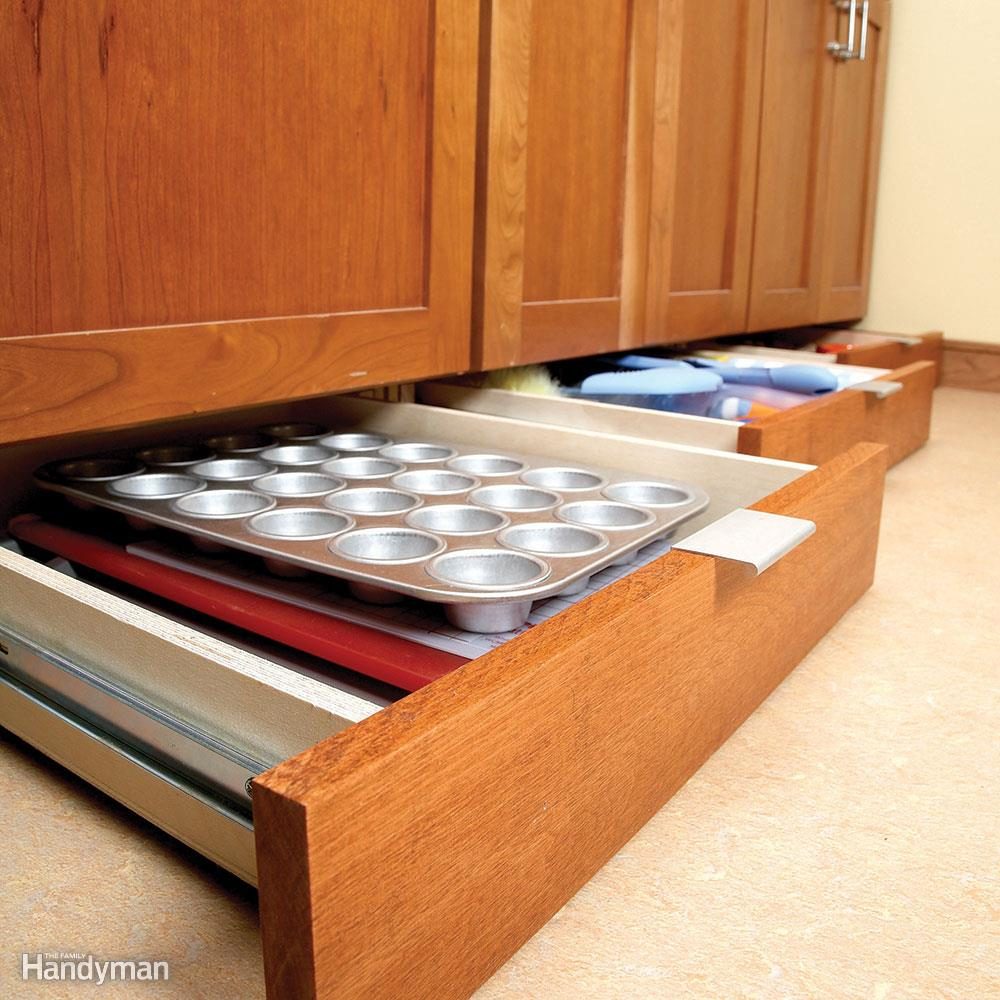
Build Rollouts at Ankle Level
Turn wasted toe-kick cavities into clever flat storage space for serving trays, cutting boards and baking pans. This article shows you how to construct self-contained rollout shelving units that you assemble in your shop and then just slip into place beneath your existing cabinets. We walk you through measuring and building the shelf and carrier units, and then installing them in your kitchen. Even if you've never built or installed a drawer before, this article will show you how.
9
/
30

Look Up for Opportunities
Create an attractive display shelf for the empty space above your kitchen cabinets. This project requires only basic carpentry skills, and you can build it in a day. We’ll walk you through it step-by-step.
10
/
30
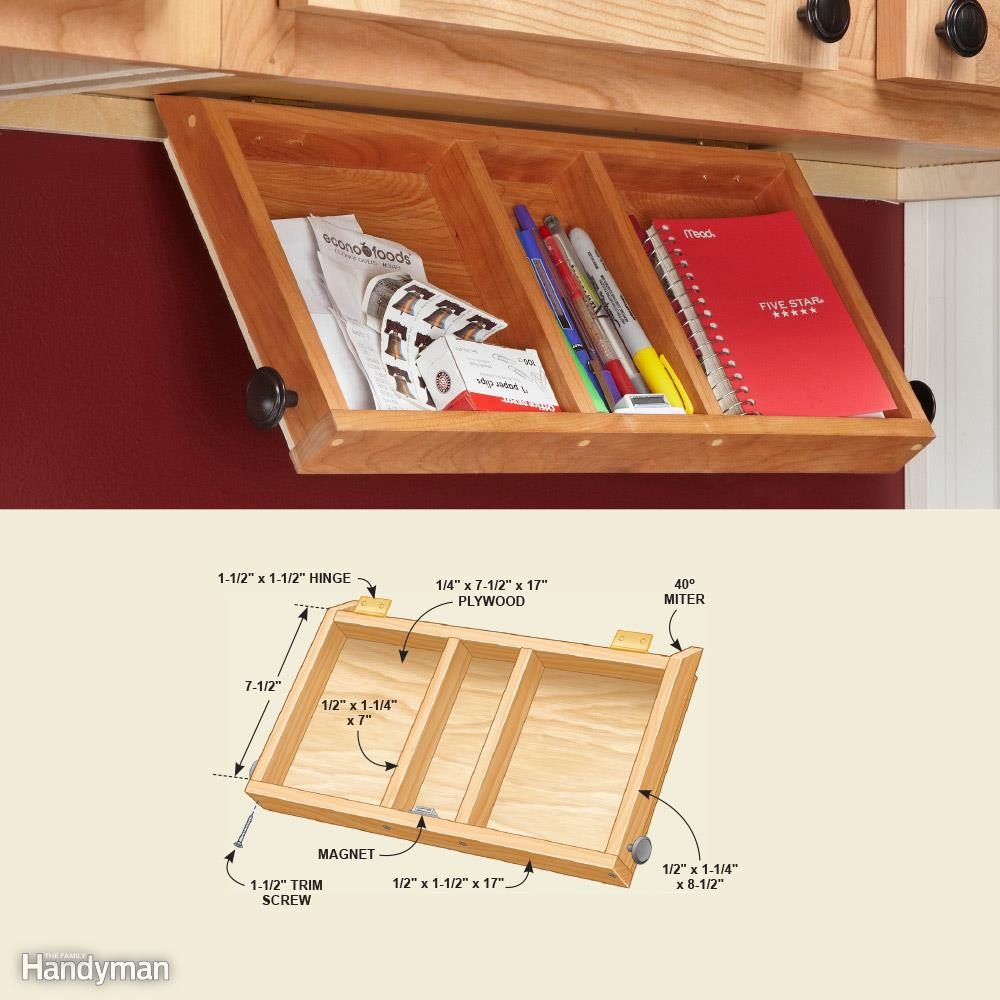
Cabinet Storage Organizers: Flip-Down Paper Tray
This tray is perfect for pens and paper. When closed, it's mostly hidden by the cabinet face frame. Hinges and magnets hold this tray in place under an upper cabinet. To install the tray, screw on the hinges first. Then open the cabinet door above and clamp the tray to the underside of the cabinet while you screw the hinges to the cabinet. Need a more robust command center? Here's how to build a message center in your kitchen instead.
11
/
30
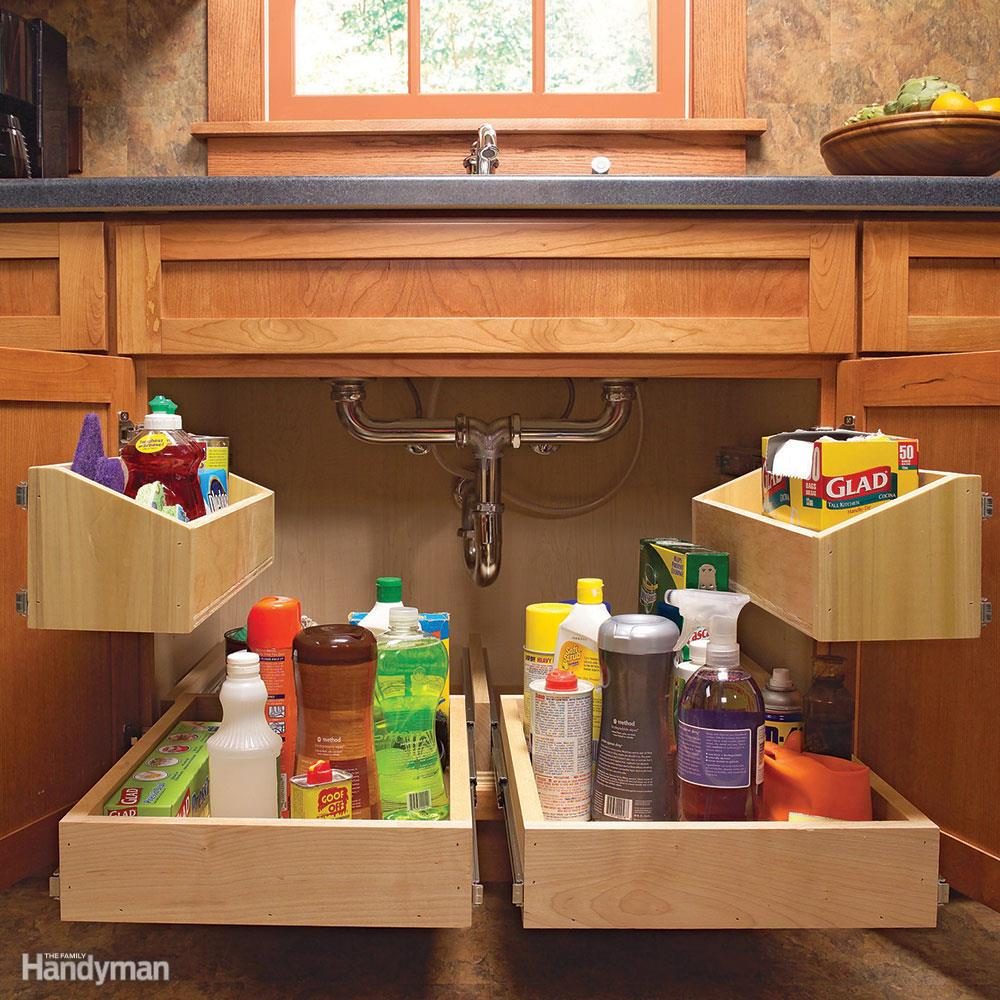
Build Rollouts in Underused Locations
The space under sinks is often overlooked, but it's prime real estate for rollouts. This article gives step-by-step instructions for how to build two types of customizable rollout trays that fit around and below plumbing pipes, garbage disposers and other obstacles beneath your sink. These rollouts transform that 'I'm not sure what's under there' storage space into an organized and efficient location for cleaning supplies that lets you see everything you've got in one glance.
12
/
30
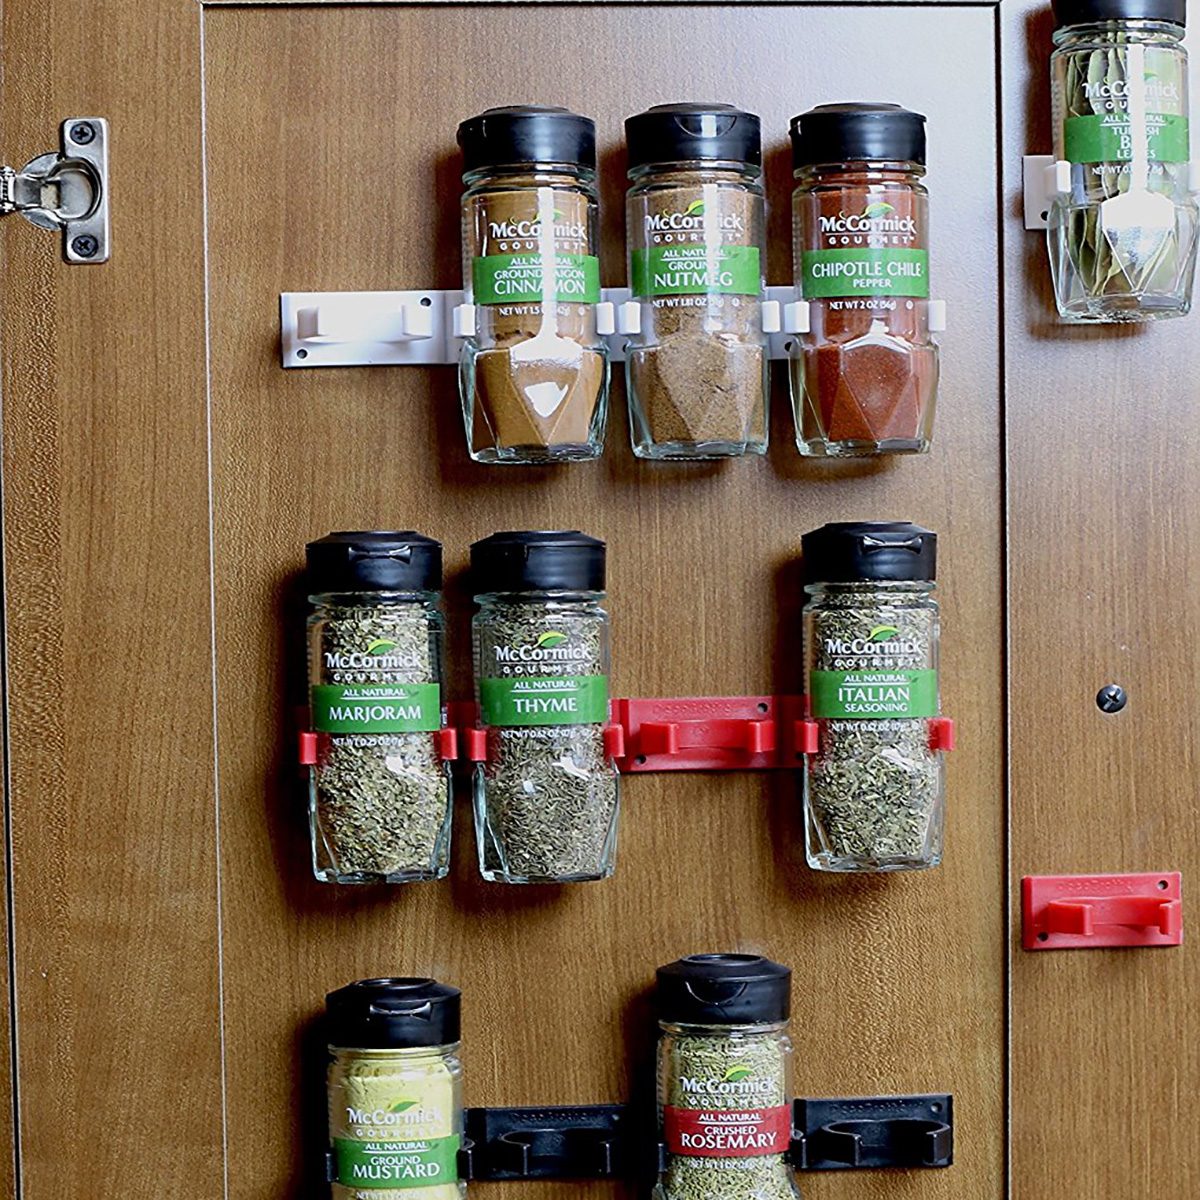
Spice Gripper Clips
Unless you love opening your spice cabinet and having little bottles of cinnamon and paprika fall on you all of the time, this is definitely one of those kitchen organization hacks you are going to want to try. These spice gripper clips keep spices in neat rows inside a cabinet or on the back of a door.
13
/
30
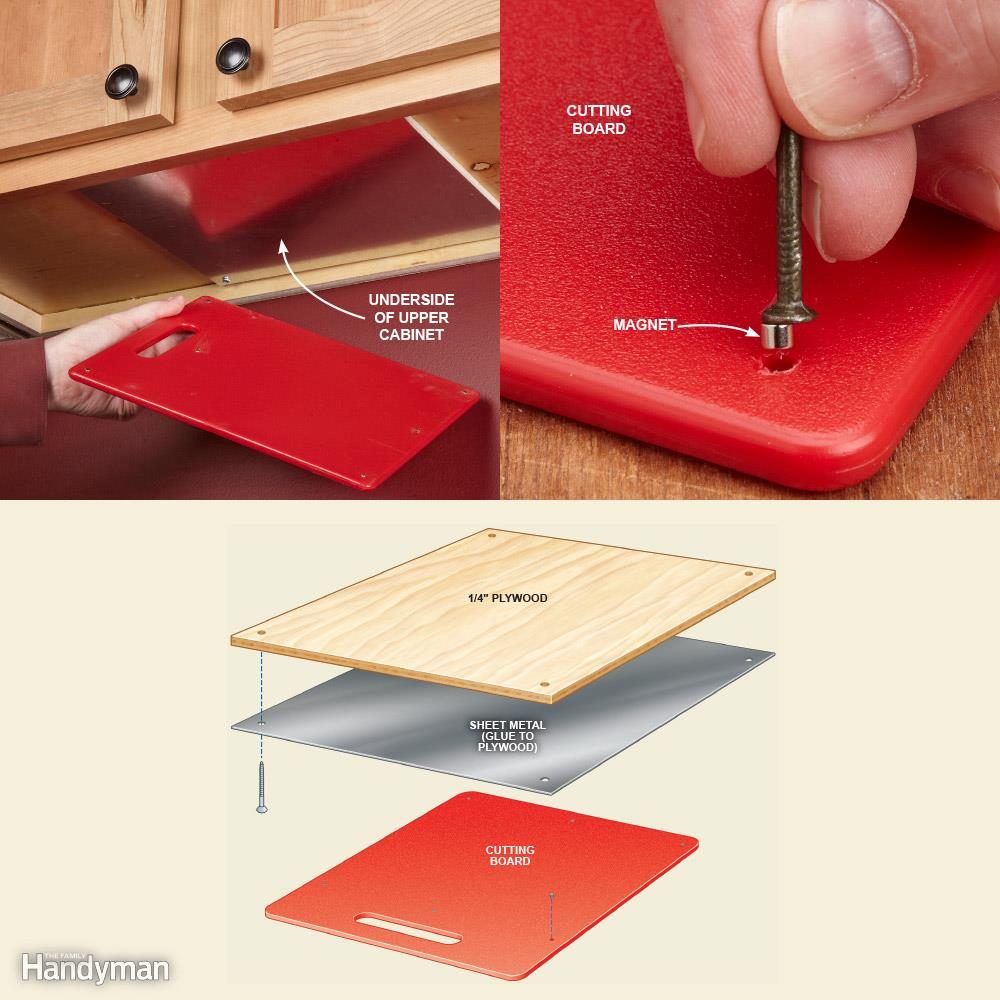
Hidden Cutting Board
The secret to this project is "rare earth" magnets. The ones we used are just 5/32 in. in diameter and 1/8 in. tall. Browse online to find lots of shapes and sizes. Implant magnets at the corners of your cutting board and add more if needed.
Make the metal plate under the cabinet larger than the cutting board so the board will be easy to put away. Glue the sheet metal to plywood with spray adhesive. Drill holes near the corners and screw it to the underside of a cabinet. Drill holes sized for the magnets and drop in a dab of super glue. Insert the magnets with a nail head. Slide the nail sideways to release the magnet. The metal plate grabs the magnets. Make sure you use galvanized steel, not aluminum. Plus, learn how to make your own cutting board!
14
/
30
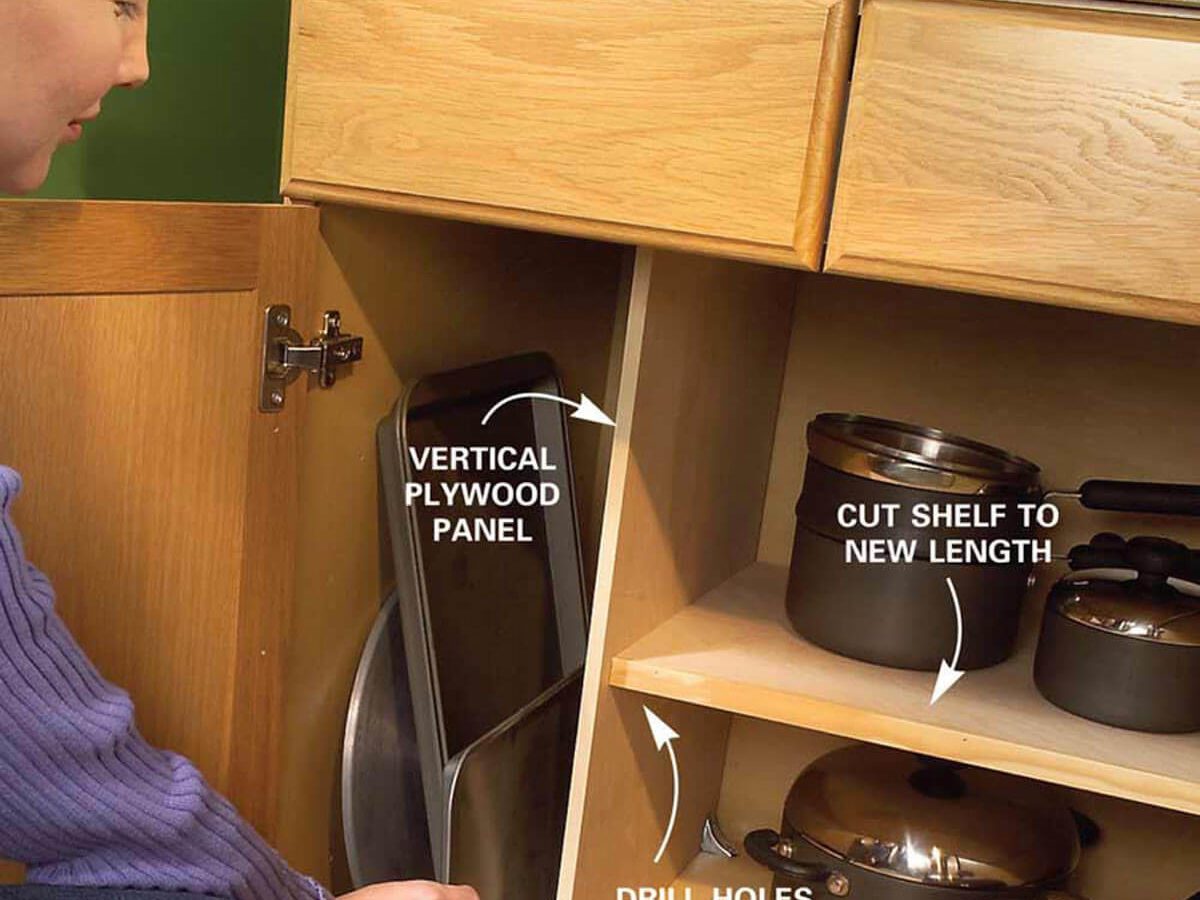
Cookware Organizer
Most kitchen base cabinets lack vertical storage space for big, flat cookware like cookie sheets and pizza pans. To provide it, just remove the lower shelf, cut a vertical panel of plywood and fasten it at the cabinet bottom with furniture braces and at the top with a strip of wood. Drill holes for the adjusting pins to match the original locations and trim the shelf to length.
15
/
30
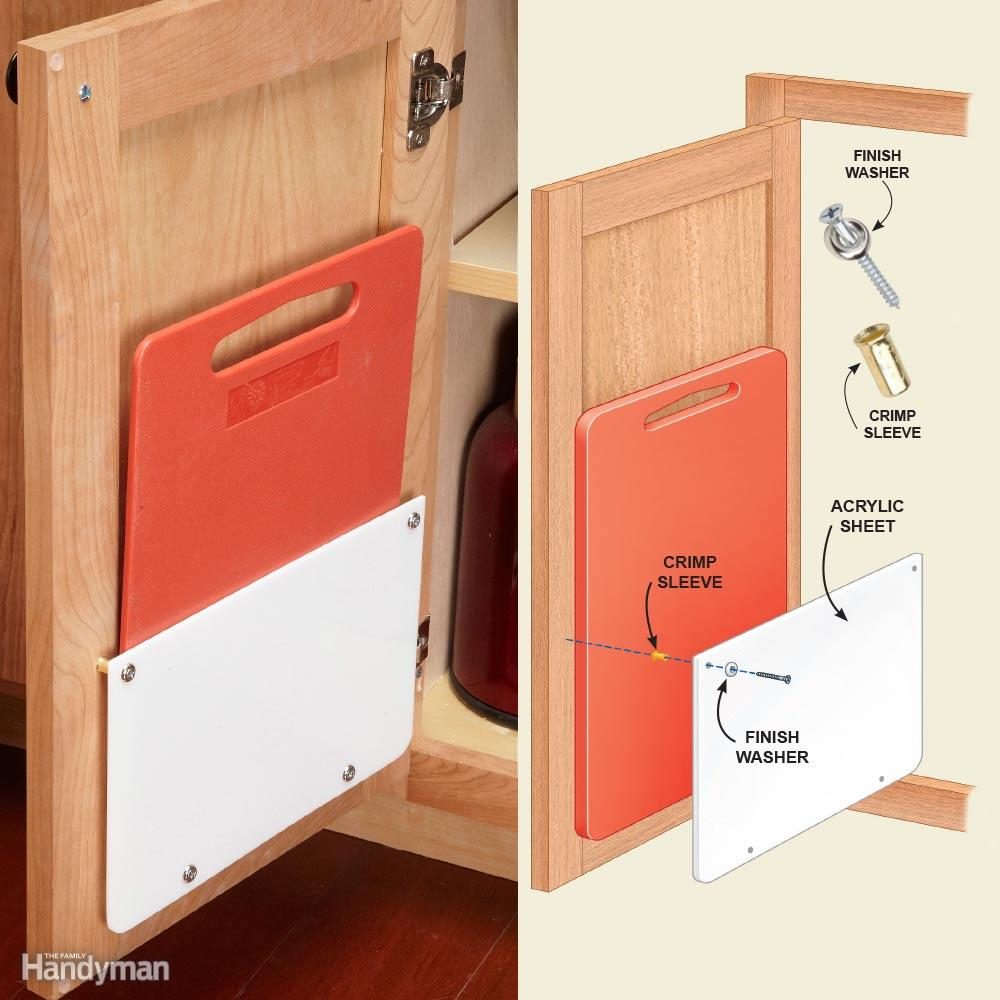
Cabinet Door Cutting Board Storage
To store cutting boards, mount a rack on a cabinet door. Use a sheet of 1/4-in.-thick acrylic plastic; plywood would also work. You can cut acrylic with a table saw or circular saw as long as you cut slowly. Knock off the sharp edges with sandpaper. Round the lower corners with a belt sander. For spacers, use No. 14-8 crimp sleeves (in the electrical aisle at home centers), or any type of tube or even blocks of wood would work.
16
/
30
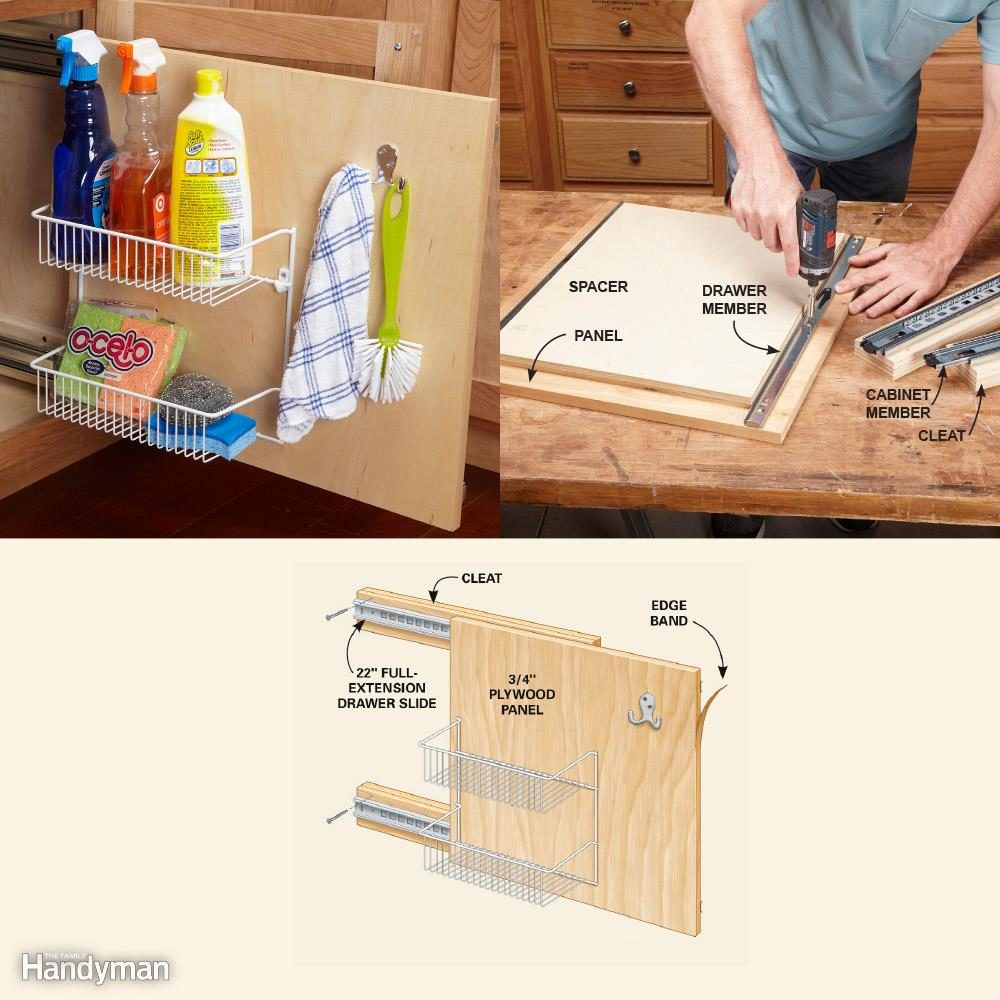
Kitchen Cabinet Storage Organizers: Rollout Storage Panel
Keep small stuff from getting lost in deep base cabinets. If you know how to mount a slab of plywood on drawer slides, you can take advantage of all the nifty shelves, hooks and holders sold at home centers. It's easy as long as you remember two critical things: First, make sure the drawer slides are parallel. Place a plywood spacer between the drawer members as you screw them to the panel. Screw the cabinet members to cleats. Second, make your cleats thick enough so that the slides will clear the cabinet door hinges. (We glued 1/2-in. plywood to 3/4-in. plywood to make my cleats.)
To install the panel in the cabinet, reassemble the slides. Hold the whole assembly against the cabinet wall and slide the panel out about 4 in. Drive screws through the cleats at the rear, then slide the panel out completely and drive screws at the front.
17
/
30
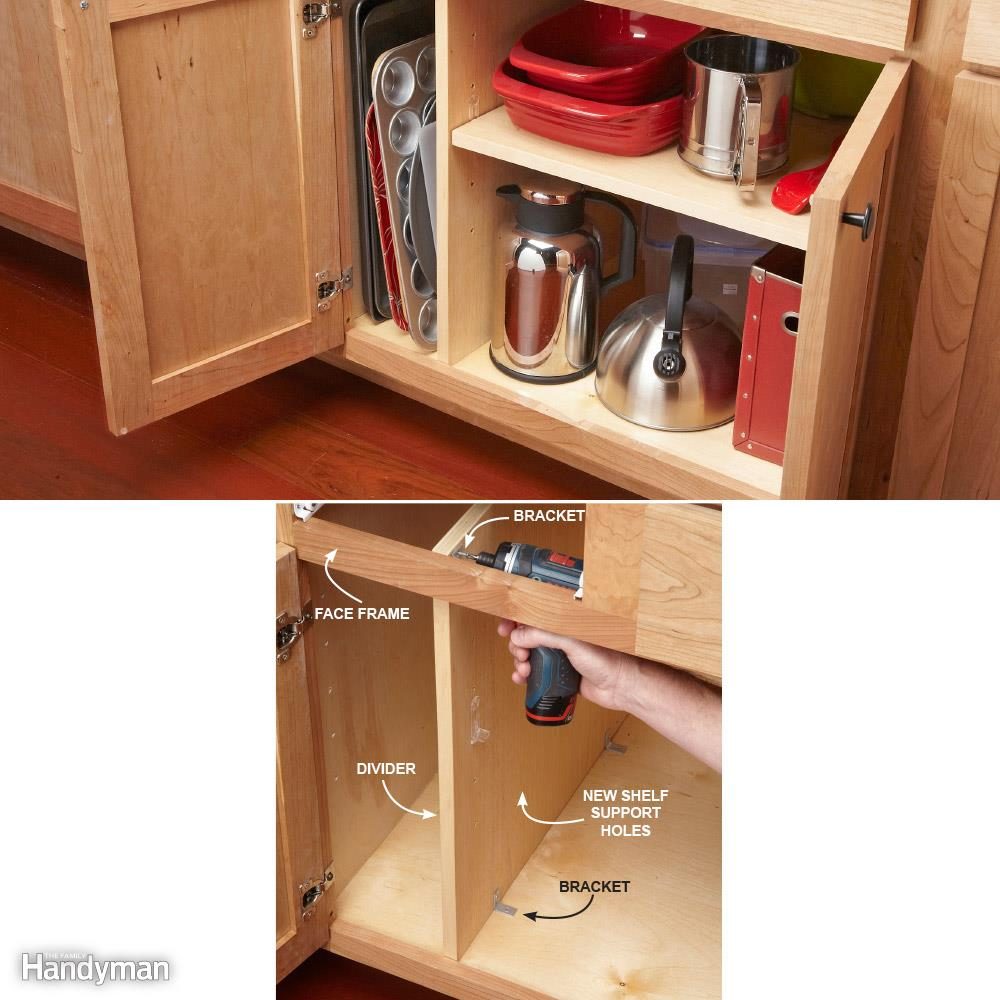
Kitchen Cabinet Dividers: Add a Divider for Upright Storage
Of course the pan or tray you need is always the one at the bottom of the pile! Here's the solution: Store large, flat stuff on edge rather than stacked up. That way, you can slide out whichever pan you need. Cut 3/4-in. plywood to match the depth of the cabinet, but make it at least an inch taller than the opening so you can fasten it to the face frame as shown. Drill shelf support holes that match the existing holes inside the cabinet. Screw two brackets to the cabinet floor; one to the face frame and one to the back wall of the cabinet (not shown). Finally, cut the old shelf to fit the new space. Here are more kitchen storage projects that create more space.
18
/
30

Under-Sink Storage Bins
What's hiding under your kitchen sink? If the space under your sink is anything like ours, it's an overcrowded jumble of cleaning supplies, sponges and plastic bags. Here's a great way to store these items right on the door of the sink cabinet. Cut a plastic storage tub in half with a utility knife and screw it to the inside of the cabinet door through the plastic lip at the top of the tub. Just make sure you position it so you can shut the cabinet door when all your bags and other supplies are in the bin.
19
/
30
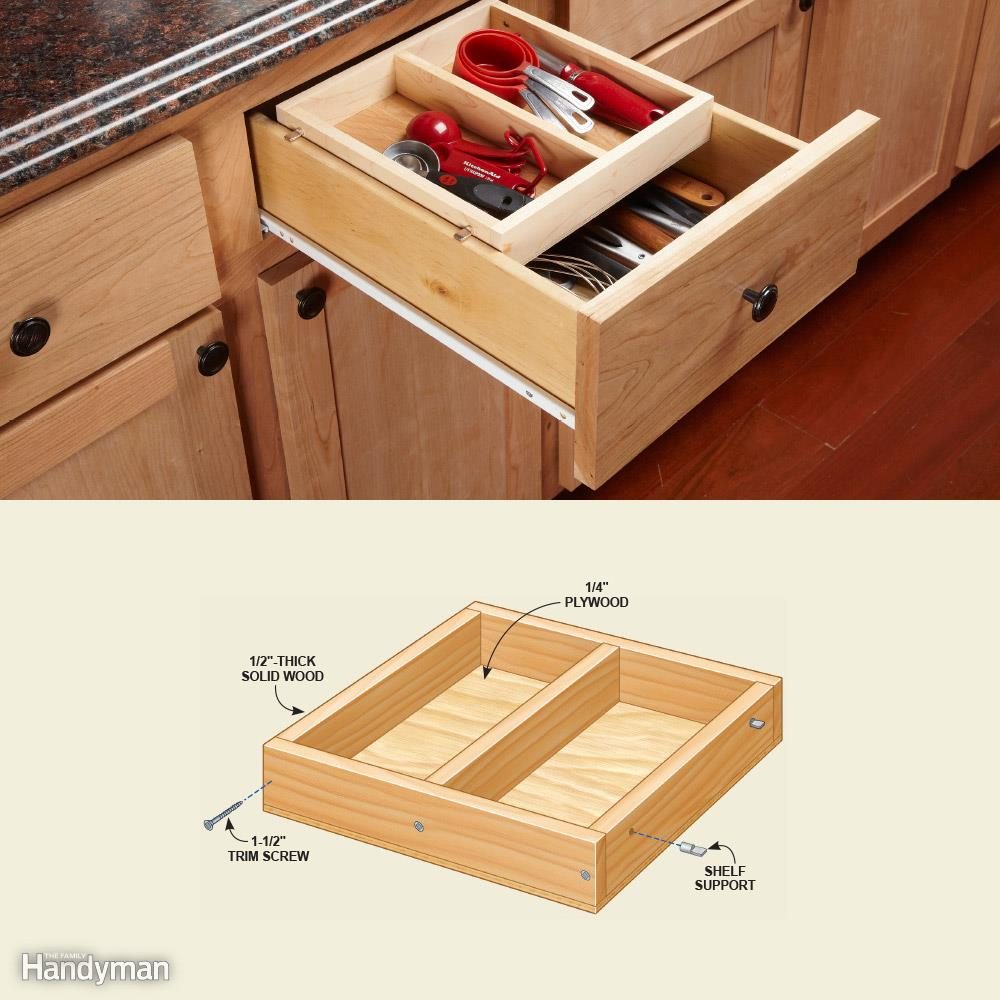
Divide Deep Drawers
Deep drawers often contain a jumbled pile of interlocking utensils. Our solution is a sliding tray that creates two shallower spaces. Make it 1/8-in. narrower than the drawer box, about half the length and any depth you want (ours is 1-3/4-in. deep).
When you position the holes for the adjustable shelf supports, don't rely on measurements and arithmetic. Instead, position the tray inside the drawer box at least 1/8-in. lower than the cabinet opening and make a mark on the tray. Our shelf supports fit tightly into the holes, but yours may require a little super glue. This simple drawer rests on shelf supports.
20
/
30
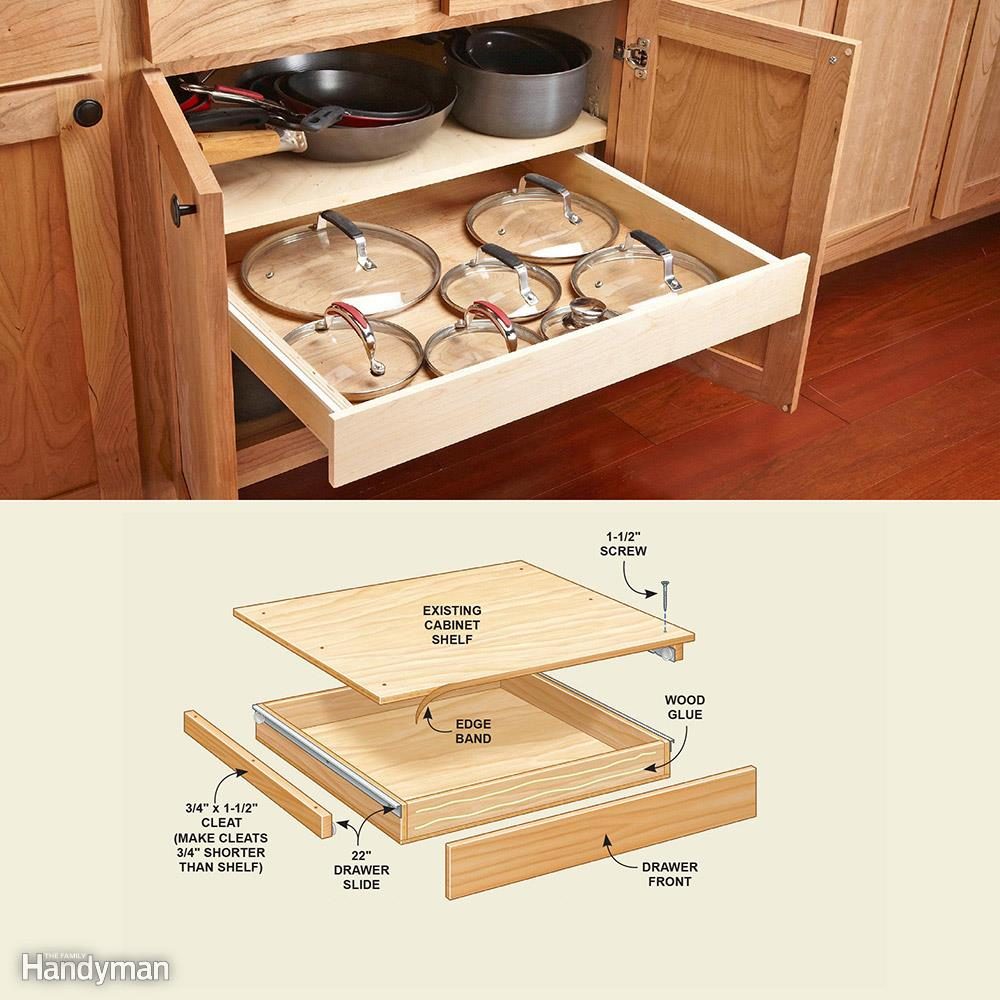
Cabinet Drawer Organizer: Rollout Drawer for Lids
You can mount a drawer for pot lids under your pot shelf—or under any other cabinet shelf. Before you remove the shelf, put some pencil marks on it to indicate the width of the cabinet opening at its narrowest point (usually at the hinges). Your drawer front and slides can't extend beyond those marks (or you'll spend hours building a drawer that won't open). Then remove the shelf. If it's made from particleboard, we recommend that you replace it with 3/4-in. plywood and transfer the marks to the new shelf. If you can build a simple drawer box, the rest will be easy. Mount the drawer on cleats screwed to the cabinet sides. Check out these apartment-friendly kitchen upgrade ideas.
21
/
30
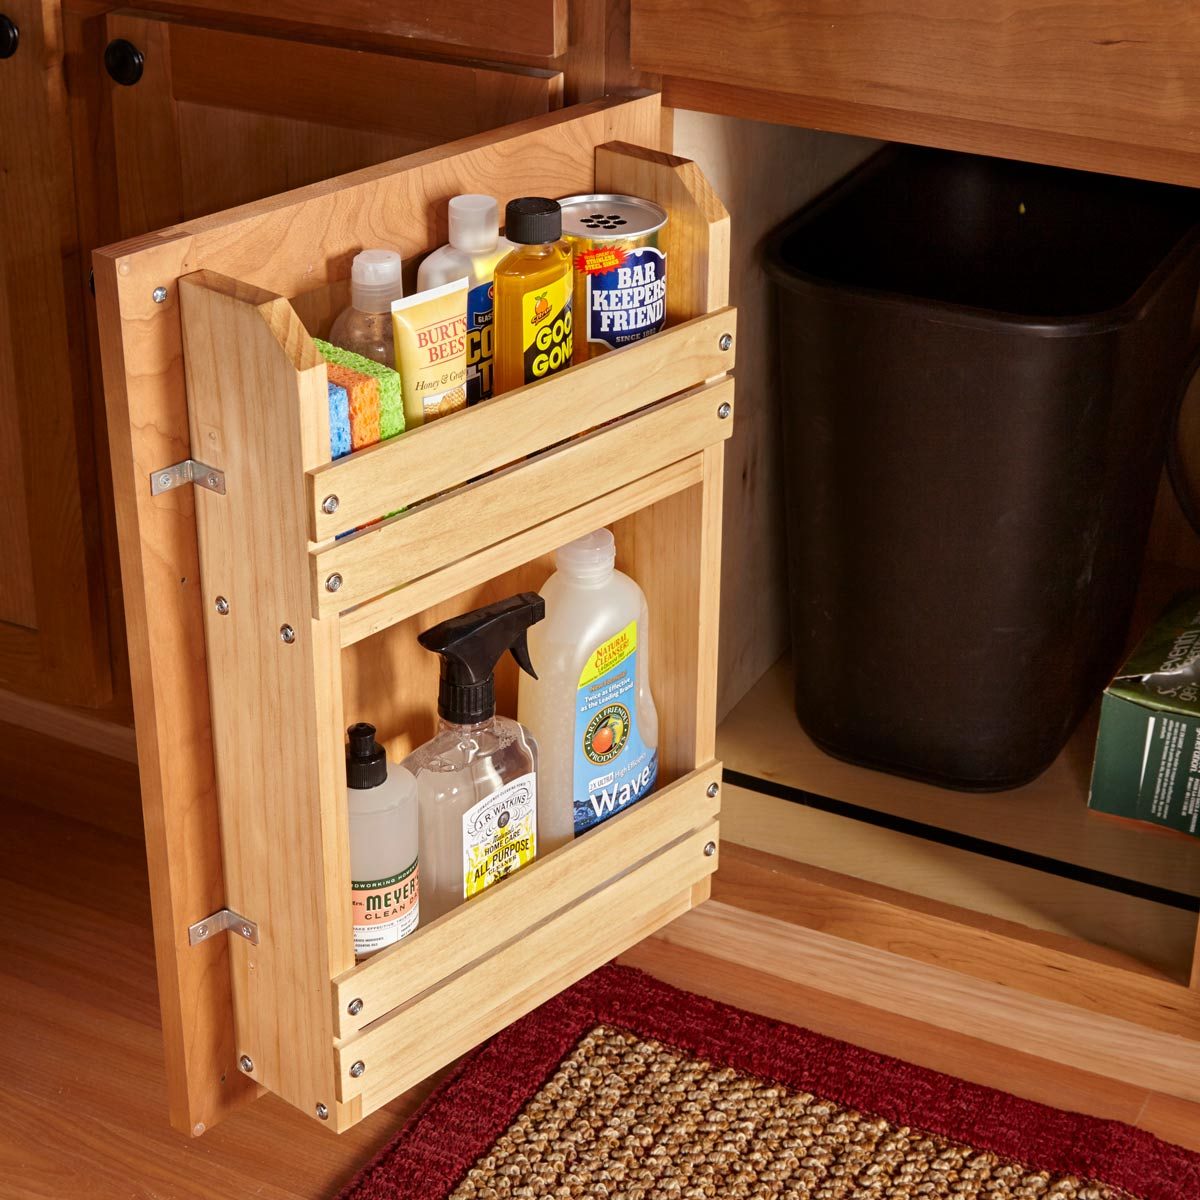
Cabinet Door Storage Rack
Here's a simple project to bring order to the chaos: A door-mounted storage rack that can be achieved with some basic carpentry skills and a few hand tools. You can modify this basic idea to organize other cabinets, too.
22
/
30
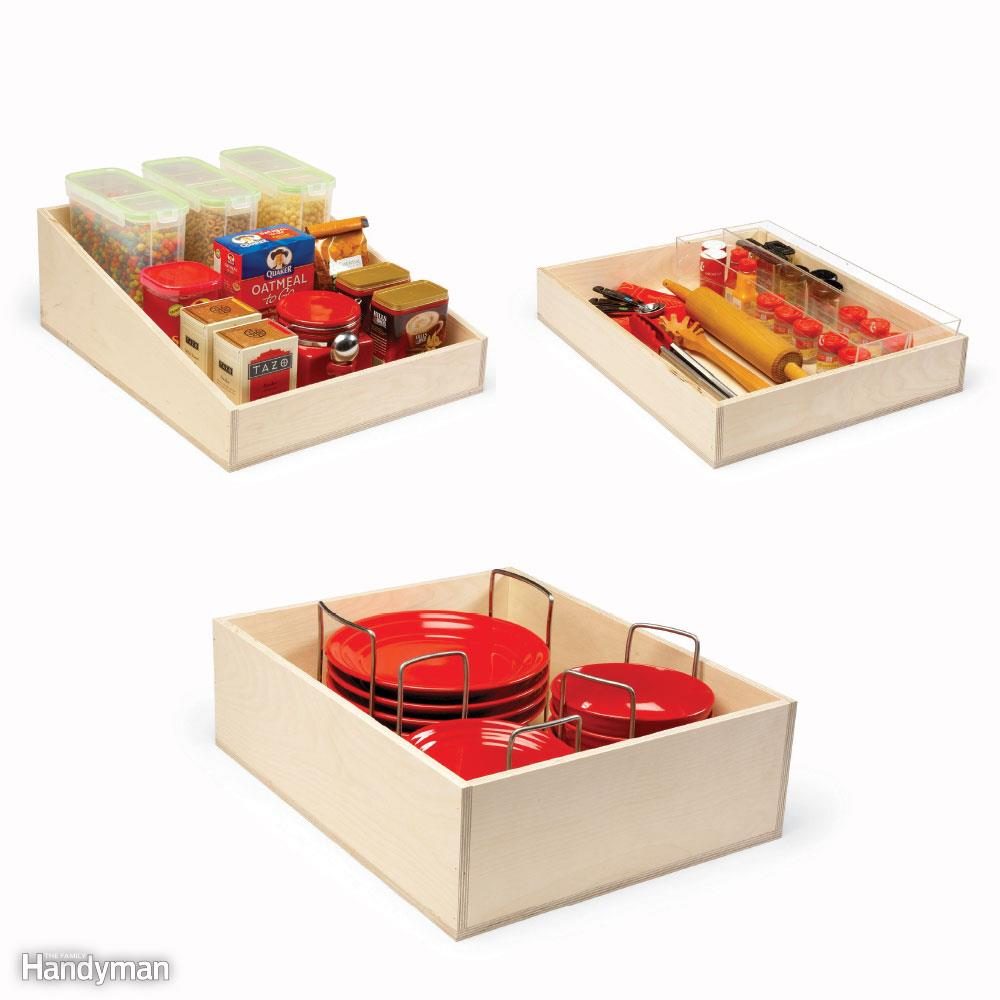
Think Inside the Box
Building a slew of identical drawer boxes is easier, but having a variety gives you more versatility. Think about what you're going to store and build the boxes to suit your needs.
Sloping sides: Rollout drawers with sloping sides keep tall things stable yet still let you see all the way to the back of the shelf. These are good for nesting pots and pans or storing different-size items on the same shelf.
Low sides: Lower sides (3 in. is typical) work well for smaller items such as canned goods and spices. The low sides make reading labels easier.
High sides: Shelves with higher sides all around (6 in. tall rather than the typical 3 in.) are ideal for tippy plastic storage containers or stacks of plates.
23
/
30
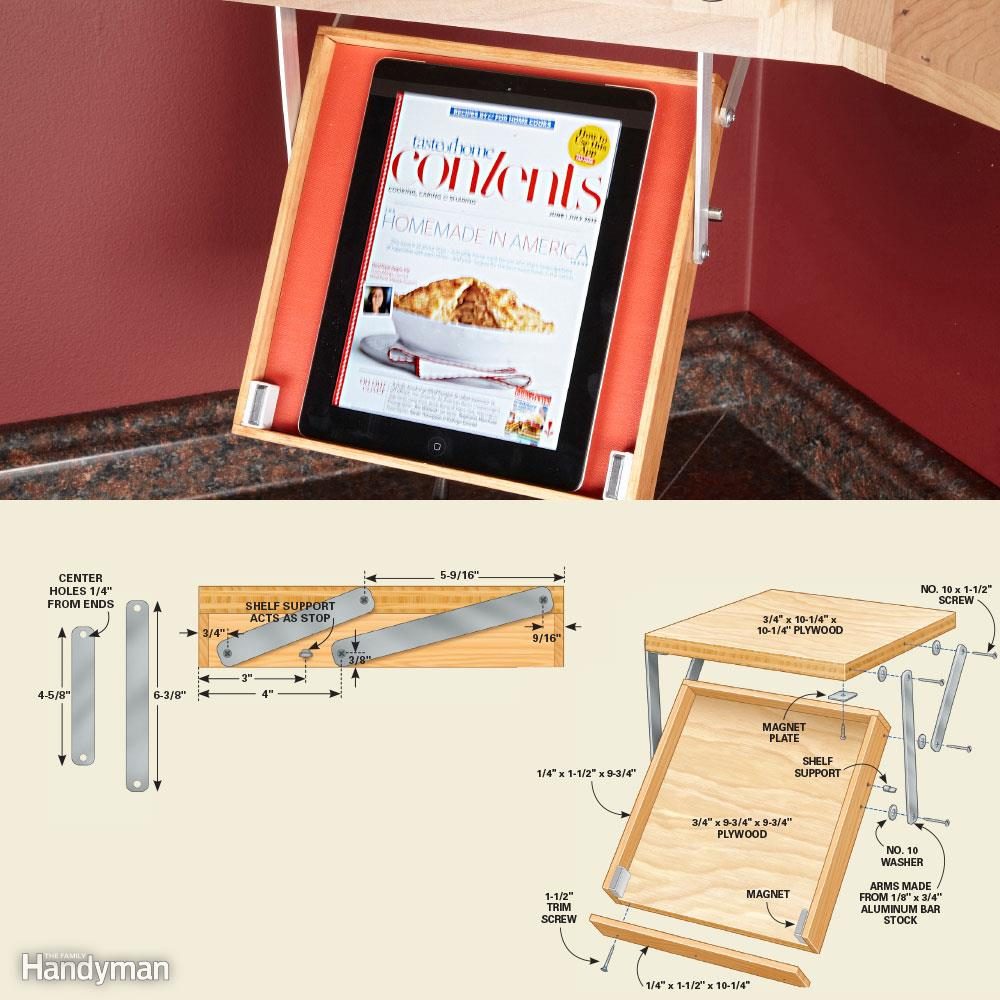
Kitchen Organization: Drop-Down Tablet Tray
Keep your tablet handy and safe. Follow recipes online without worrying about spills frying your expensive tablet. This tray will keep your tablet computer off the countertop. As it swings down, it also swings forward, so the tablet isn't hidden under the cabinet. The mechanism is simple; just make and position the arms exactly as shown here and it will work smoothly. We cut the aluminum parts and rounded the corners with a grinder. When closed, small cabinet door magnets hold up the tray. We clipped the plastic ears off the magnets and glued the magnets into place with epoxy. The liner in the tray is a foam placemat cut to fit. The shelf folds up against a plywood top and is an option for kitchen cabinet organizers. Aluminum arms hold the tray in position. Don't worry, small magnets won't harm your tablet; it actually contains magnets. Plus: Keep your kitchen clean as a whistle with these secret cleaning tips from professional house cleaners.
24
/
30
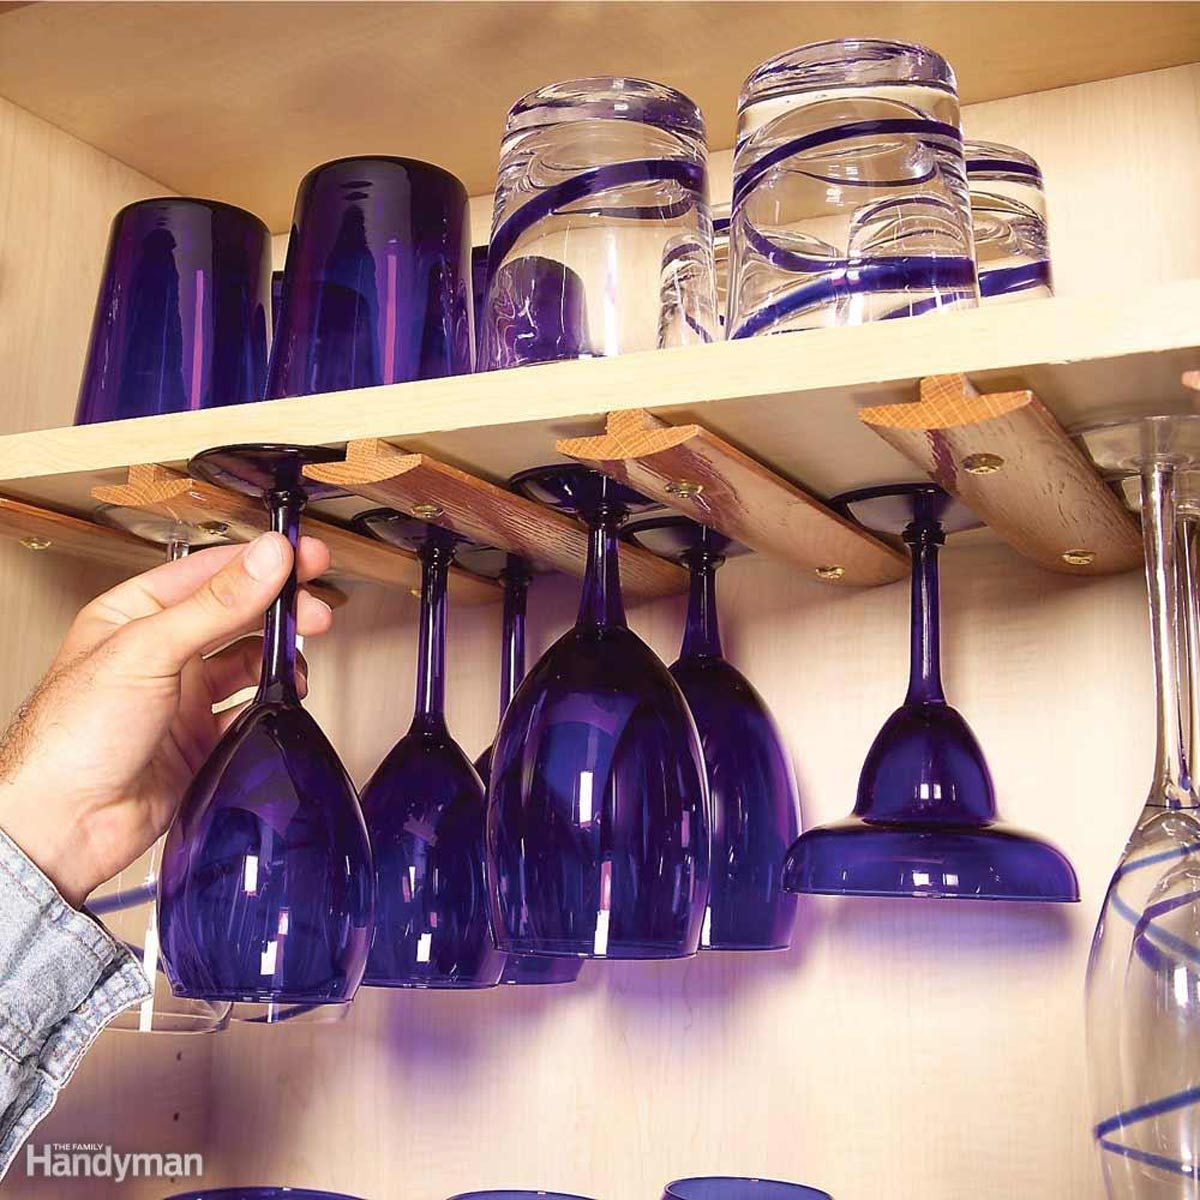
Kitchen Storage: Wine-Glass Molding
T-molding designed for wood floor transitions makes a perfect rack for stemware. Just cut it to length, predrill screw holes and screw it to the underside of a shelf. For a neater look, use brass screws and finish washers. Prefinished T-molding is available wherever wood flooring is sold. A 4-ft. section costs about $25.
25
/
30
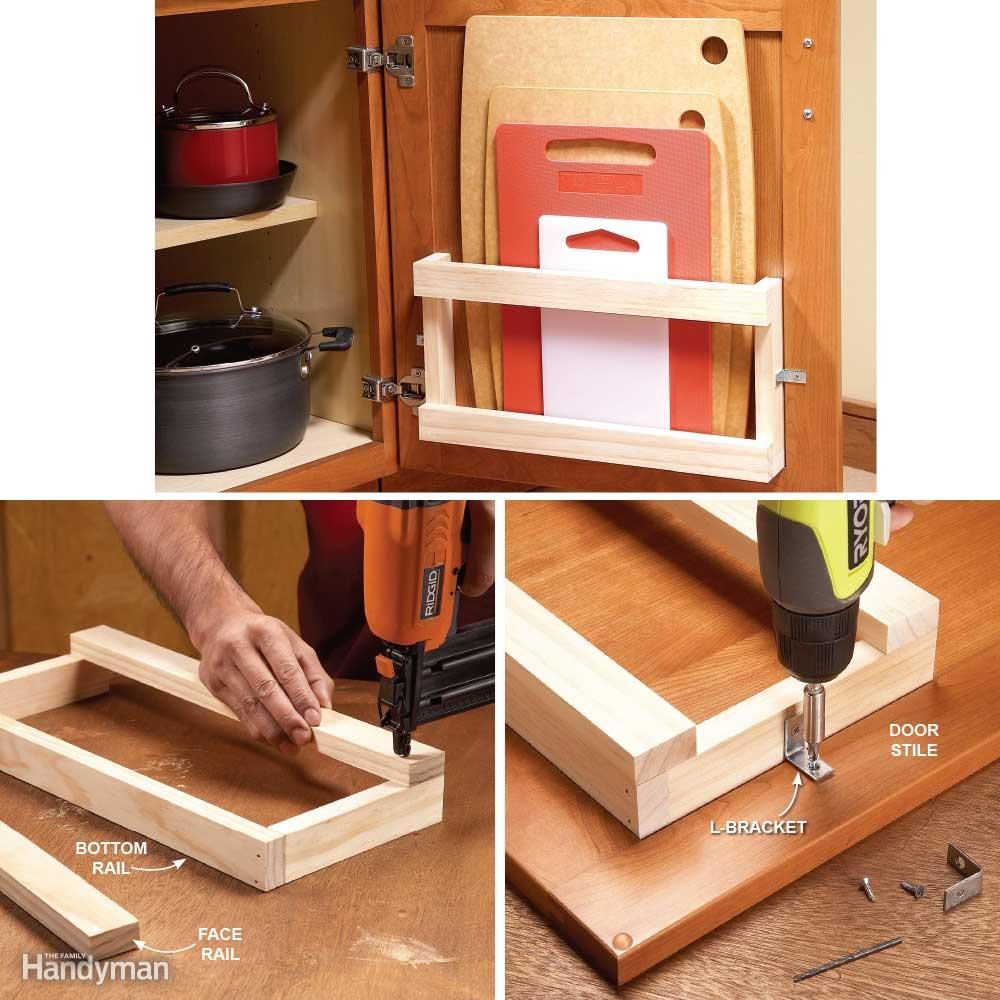
Behind the Door Storage: Cutting Board Rack
You can make this nifty, inexpensive rack and mount it inside a cabinet door to stash your cutting boards out of sight. It goes together in a snap since it only requires a 6-ft. 1x2 and two L-brackets.
Measure between the door stiles to get the maximum width of your rack. Make sure the rack will be wide enough for your cutting board (or spring for a new one). You'll also need to mount the rack low enough so it doesn't bump into a cabinet shelf when the door closes. Cut the bottom and face rails to match the space between the cabinet door stiles.
Cut the sides 7-1/4 in. long. Nail the sides to the base. Then nail the two face pieces at the top and bottom to complete the rack (photo, left). The easiest way to mount the rack is to take the cabinet door off its hinges and lay it down. Predrill the screw holes for the L-brackets and mount the rack to the cabinet door using a 1-in. L-bracket centered on each side of the rack.
26
/
30
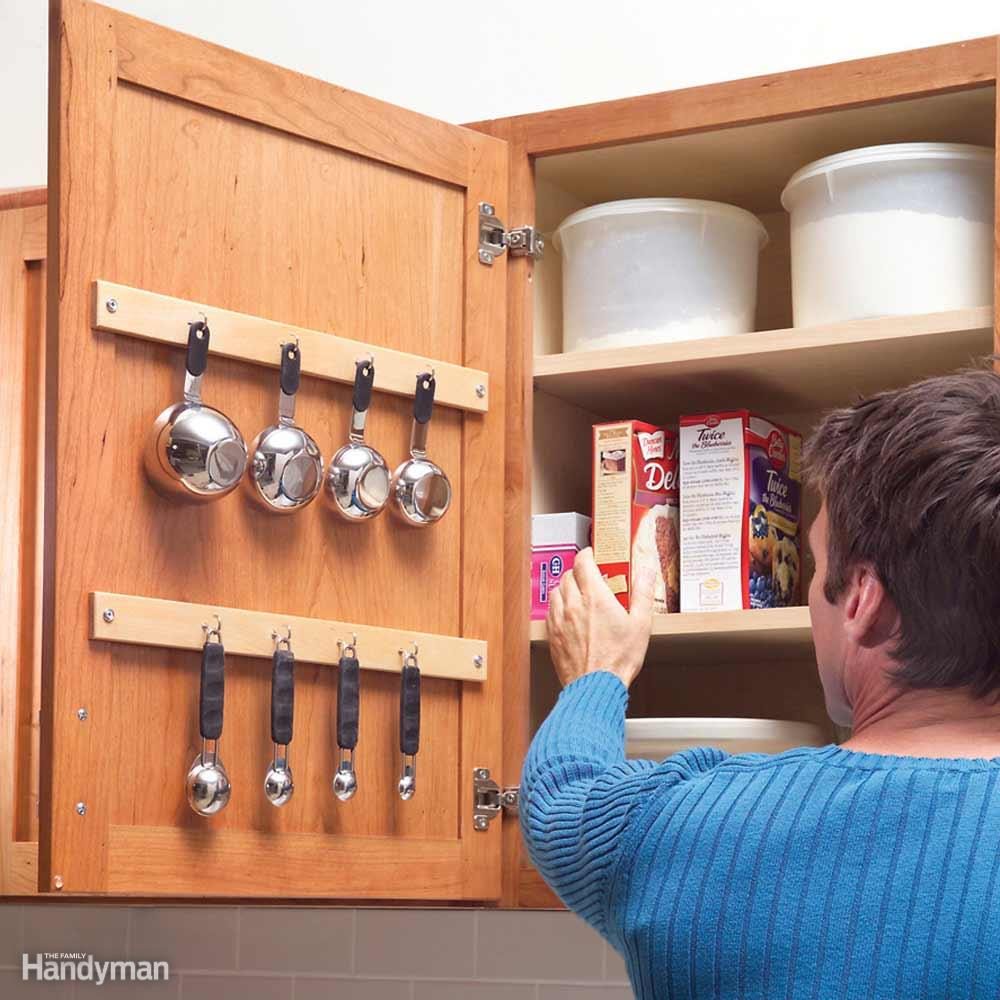
Cabinet Door Measuring Cup Storage Rack
Free up pantry storage space by hanging measuring cups inside a kitchen cabinet. Position and mount a wood strip so that the cups will hang between the shelves and allow the door to close completely. Mount a second strip for your measuring spoons, then screw in cup hooks on both strips.
27
/
30
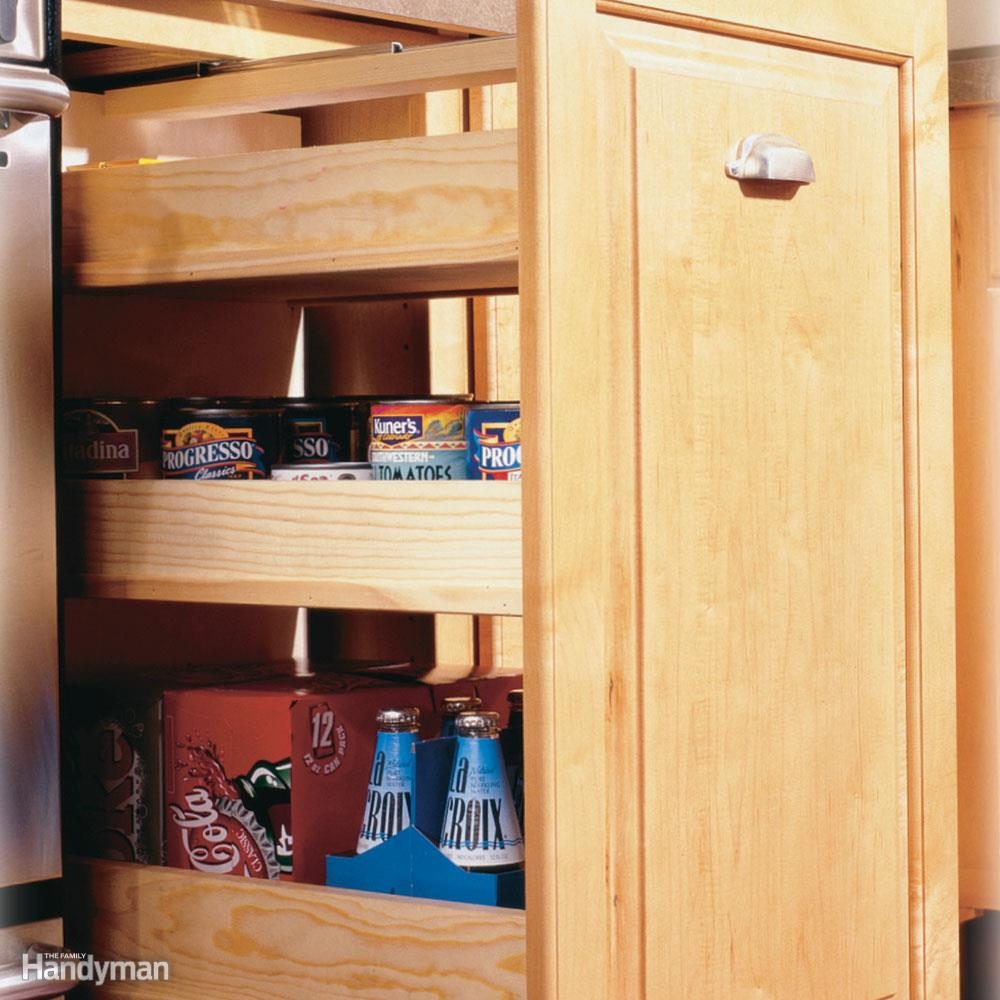
Build a Roll-Out Pantry Cabinet
Most cabinet manufacturers now include roll-out shelves in their base cabinets. But if you don't have this convenience, this project will one-up those shelves. Here we'll show you how to make an entire roll-out pantry.
The hardware consists of two heavy-duty bottom-mounted slides and one center-mounted top slide that together can support 130 lbs. Again, construct your unit to suit your needs. We made our bottom tray 3-1/2 in. tall and the upper ones 2-1/2 in. tall. You may want to include only two trays if you'll be storing cereal boxes and other tall packages.
Since you'll be converting your door from swinging to rolling mode, you'll need to remove the door and hinges. You'll also have to remove the existing handle and reinstall it centered on the door. If your hardware mounts from the backside, install it before attaching the door. Get the full instructions here.
28
/
30
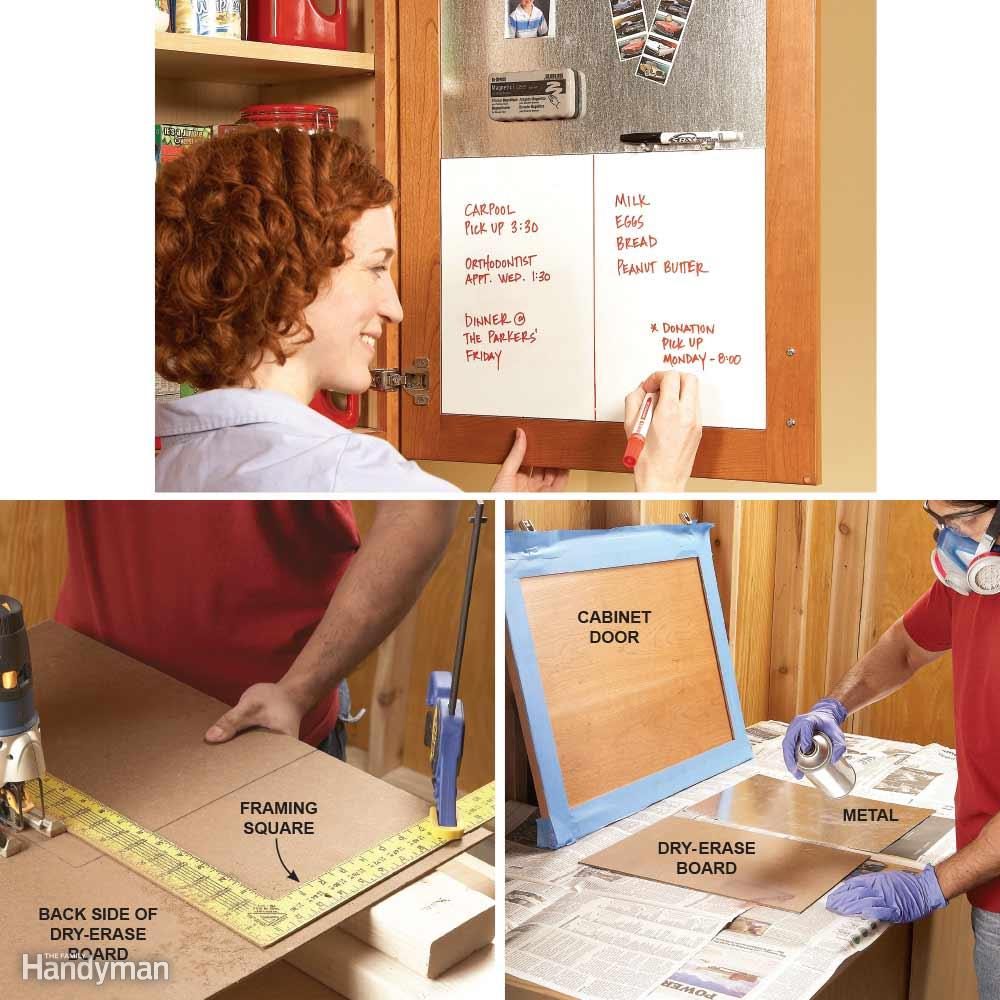
Cabinet Door Message Board
A sheet of metal and a dry-erase board can turn any cabinet door into a convenient message center. You'll find 2 x 2-ft. lengths of plastic-coated hardboard (often called 'whiteboard') and sheet metal at a hardware store or home center. Larger hardware stores will cut the sheet metal to your specifications. Be sure to get steel instead of aluminum so magnets will stick.
If you cut the metal yourself, wear gloves to protect your hands and use tin snips carefully. Use a metal file to smooth any ragged edges. If you don't have a table saw to cut the whiteboard, flip it over, mark your measurements and use a jigsaw to cut it from the back to prevent chipping or splintering. To get a straight cut, use a framing square as a guide (photo, left).
To mount the metal sheet and whiteboard to the inside of the door, take the door off its hinges, lay it flat and carefully mask off the area where you want to spray the adhesive. Follow the directions on the can to apply the adhesive to the door, metal and whiteboard (photo, right). Mount the pieces, press firmly and let dry.
29
/
30
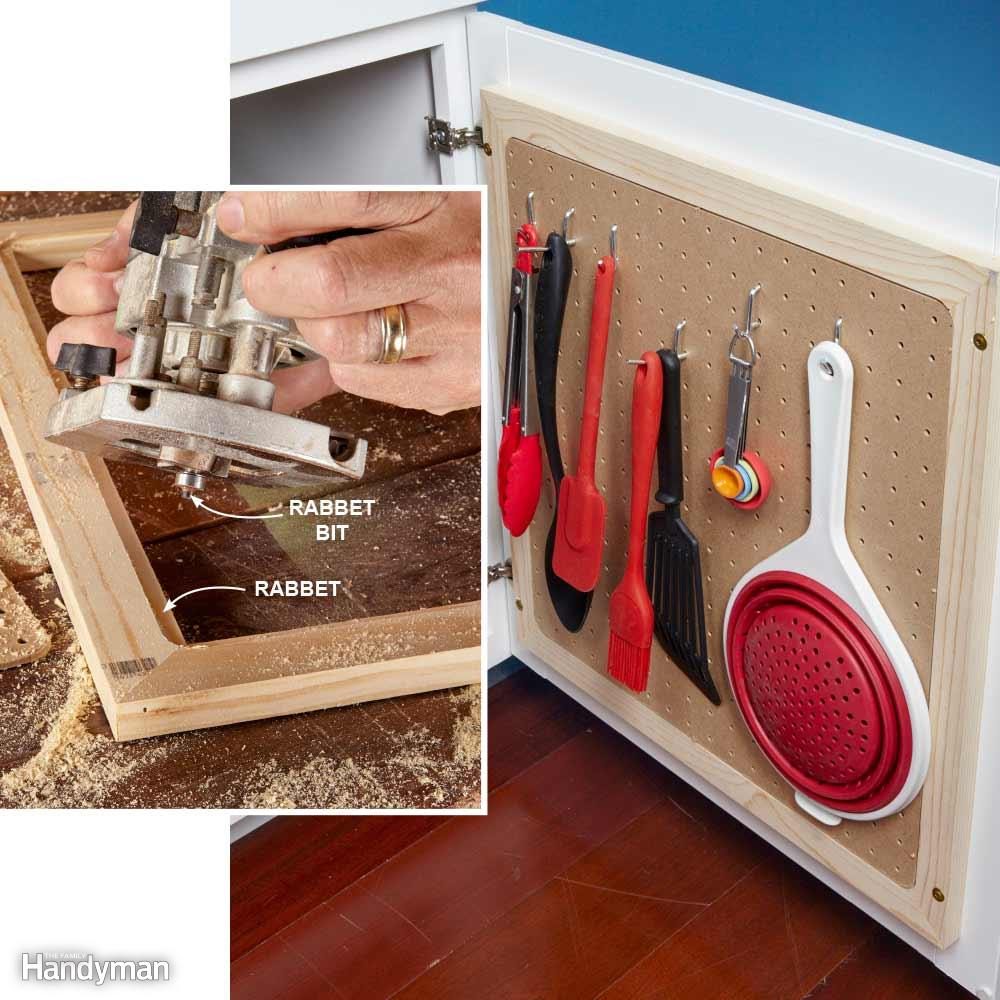
Storage Behind Closed Doors
Pegboard is great for organizing kitchens, laundry rooms and bathroom cabinets. Rout a groove in a 1x2 frame using a rabbet bit, attach the pegboard with glue and brads, then mount it to the door. The frame helps support the edges of the pegboard and creates a 1/2-in. space behind the board so pegs can be inserted.
30
/
30
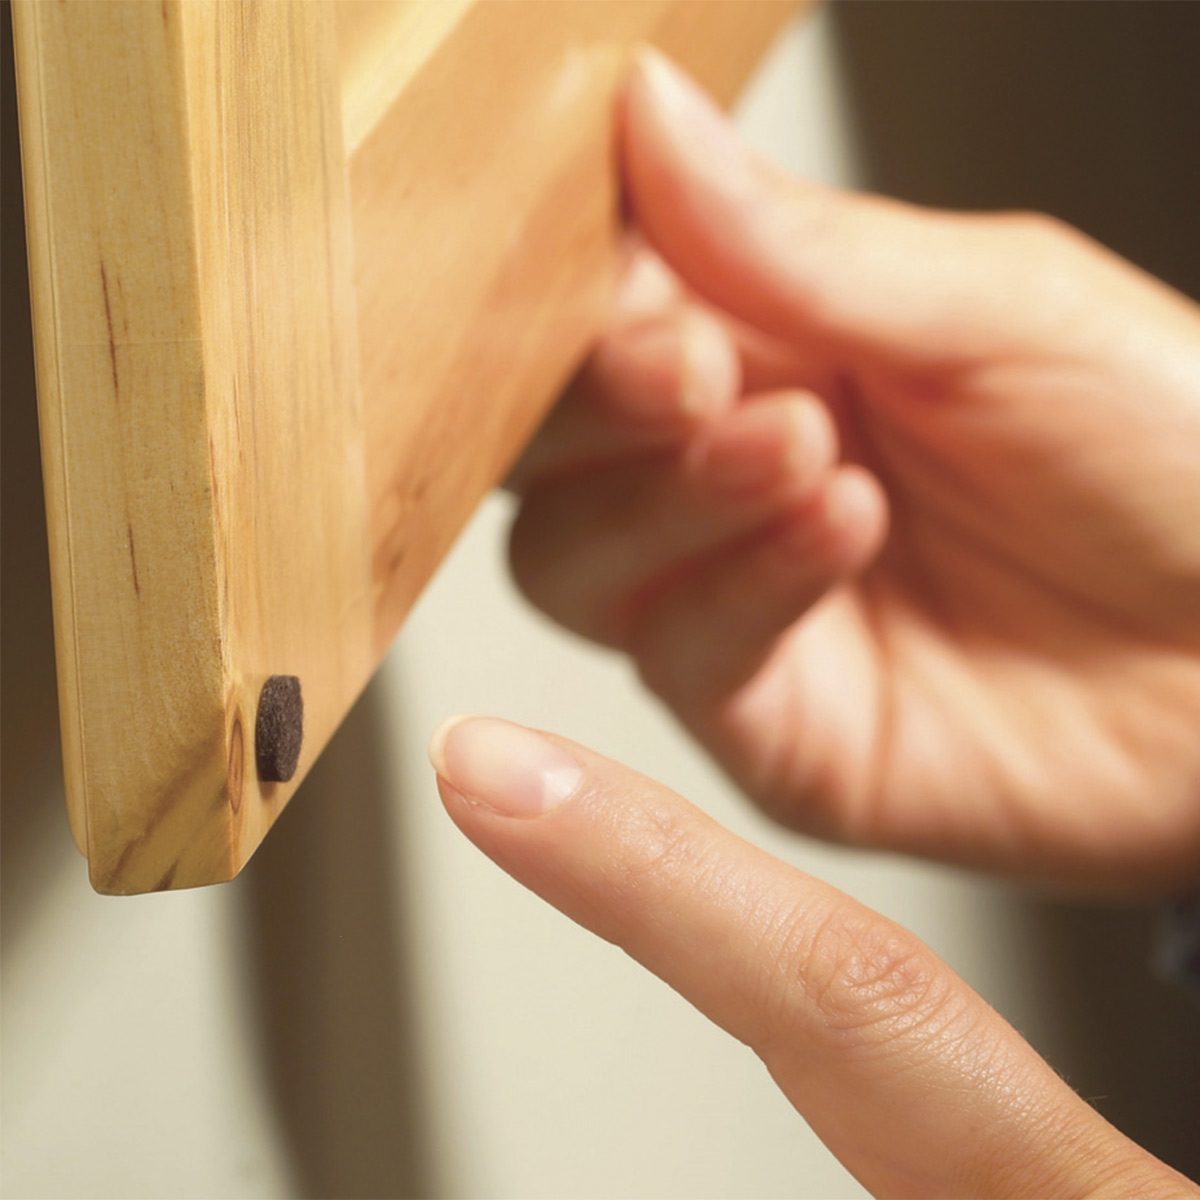
Fix Loud Cabinet Doors
Tired of listening to those cabinet doors bang shut? Peel-and-stick door and drawer bumpers are the solution for loud kitchen cabinets. Get a pack of 20 at a home center for a few dollars or online at Amazon. Make sure the back of the door is clean so the bumpers will stick, then place one at the top corner and another at the bottom.